It is one of the popular IDEs used to build C++ applications.
What is Code::Blocks IDE
Code::Blocks is a free and open-source integrated development environment (IDE) for programming in several programming languages, including C, C++, and Fortran. It is available for Windows, Linux, and macOS operating systems.
Code::Blocks provides a user-friendly interface for writing and debugging code, with features such as syntax highlighting, code folding, auto-indentation, and code completion. It also supports multiple compilers, such as GCC, Clang, and Visual C++, allowing developers to choose the one that best fits their needs.
Code::Blocks includes various tools and features to help with the development process, such as a built-in debugger, profiler, and graphical user interface designer. It also supports plugins that can be used to extend its functionality, such as support for additional compilers or new languages.
Code::Blocks is known for its simplicity and ease of use, making it a popular choice among developers who are just starting out or who prefer a lightweight and flexible development environment. Its open-source nature also makes it an attractive option for those who want to customize or extend the IDE according to their specific needs.
Why use Code::Blocks IDE ?
Here are some reasons why you might choose to use Code::Blocks as your C++ development environment:
- Cross-platform support: Code::Blocks is available on different operating systems, which makes it easy to use across different platforms without having to learn a new IDE for each platform.
- Free and open-source: Code::Blocks is completely free to download, use, and modify. This makes it accessible to anyone who wants to learn or develop C++ applications.
- Customizable: Code::Blocks is highly customizable, allowing you to change the look and feel of the IDE, as well as adding plugins and additional features.
- Easy to use: Code::Blocks is designed to be user-friendly, making it easy to create and manage C++ projects.
- Integrated debugging: Code::Blocks comes with an integrated debugger, which makes it easy to find and fix errors in your code.
- Project management: Code::Blocks provides a project management system that helps you organize your source files, libraries, and build configurations. This can help simplify the development process and make it easier to manage complex projects.
Overall, Code::Blocks is a popular choice for C++ development because of its simplicity, customizability, and cross-platform support.
How to install Code::Blocks IDE
Here are the steps to install Code::Blocks on Windows:
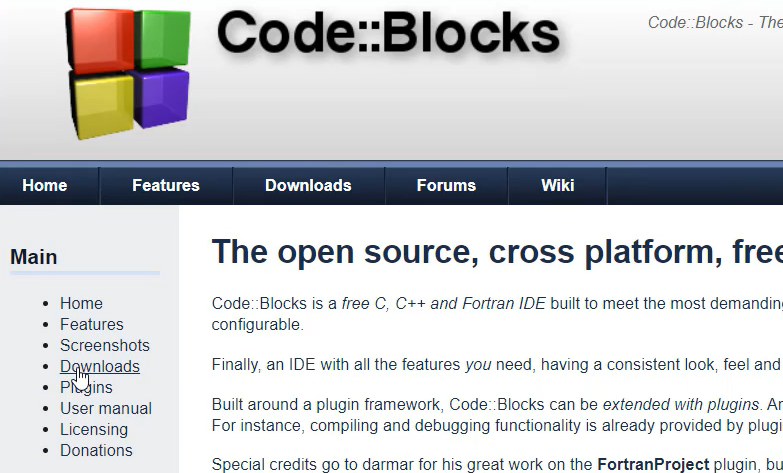
- Go to the Code::Blocks website (http://www.codeblocks.org/downloads) and click on the “Downloads” link for the Windows installer. Better, you try to install IDE with compiler, unless compiler is already installed on your computer.
- Once the download is complete, run the installer file by double-clicking on it. You may be prompted to give permission to run the installer, so click “Yes” or “Run” if you see these prompts.
- The installer will launch and you will be presented with the Code::Blocks Setup Wizard. Click “Next” to proceed.
- Read and accept the License Agreement, then click “Next”.
- Choose the installation directory for Code::Blocks. The default location is usually fine, so you can just click “Next” to continue.
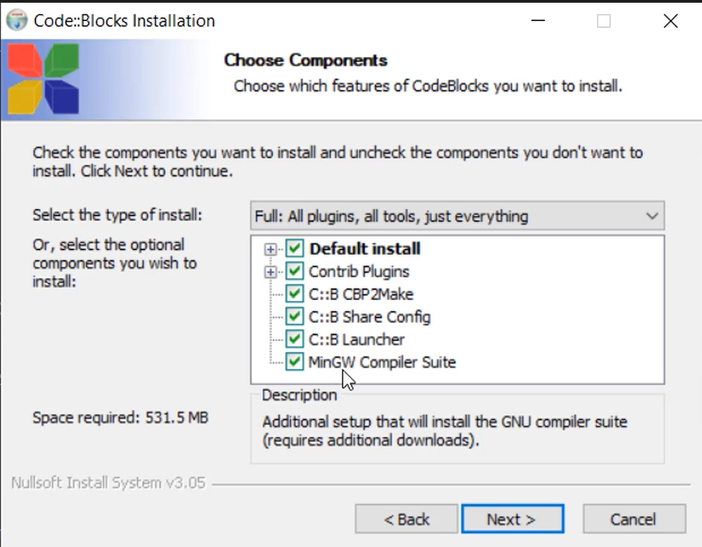
- Choose the components you want to install. You can leave the default options selected, or choose additional components if you need them. Then click “Next”.
- Choose the additional tasks you want to perform, such as creating a desktop shortcut or adding Code::Blocks to the system path. Click “Next” when you are done.
- Review the installation settings and click “Install” to begin the installation process.
- The installer will begin installing Code::Blocks and any selected components. This may take a few minutes.
- Once the installation is complete, click “Finish” to exit the installer.
Code::Blocks is now installed on your Windows system and is ready to use. You can launch it from the Start menu or from the desktop shortcut if you chose to create one during the installation process.
Better, you try to install IDE with compiler, unless compiler is already installed on your computer.

During the installation process, it asks you to choose components. Here, you select all the components.
Launching Code::Blocks IDE
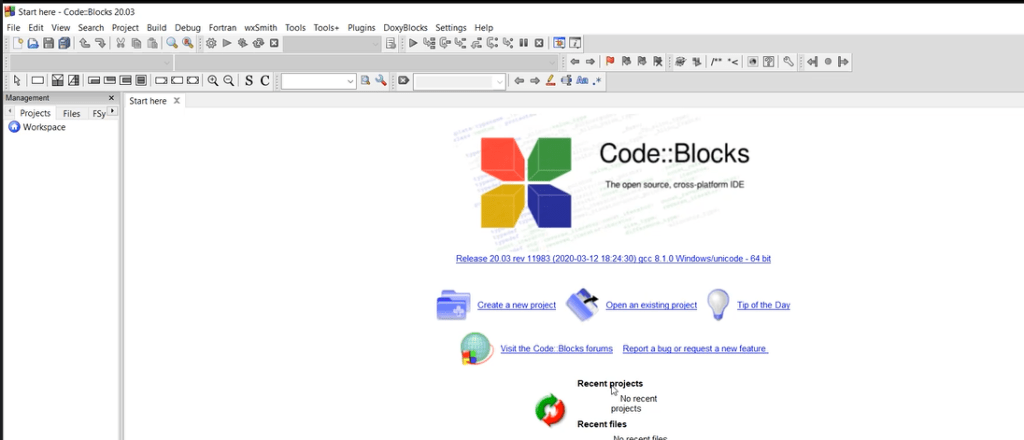
The first screen when you launch the IDE
Create C++ Project in Code::Blocks IDE
check this link also – https://www.udemy.com/course/cpp-4skills/learn/lecture/22617470#overview
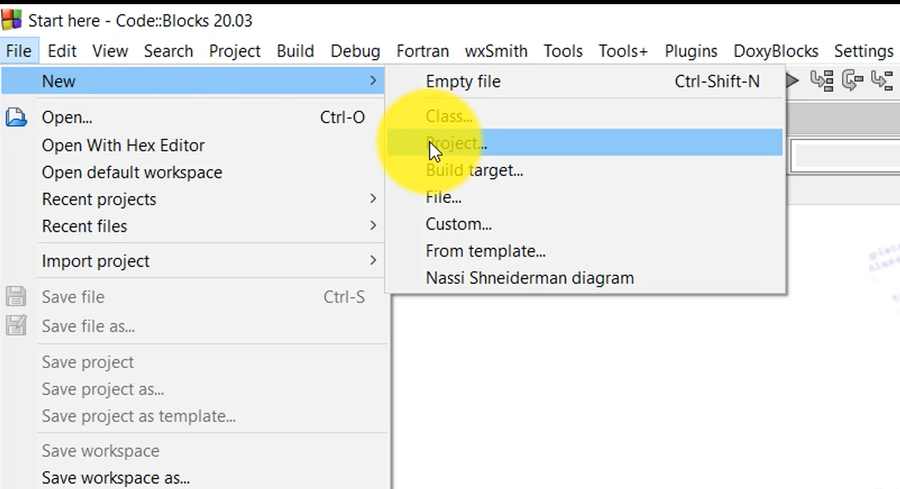
Step 1 – Click on “File” in the top menu and select “New” from the drop-down menu – click on Project.
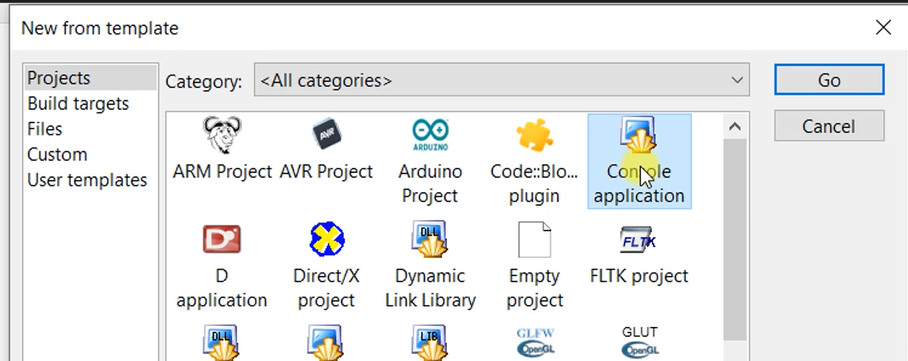
Step 2 – In the “New from template” dialog box, select “Console application” and click “Go”.
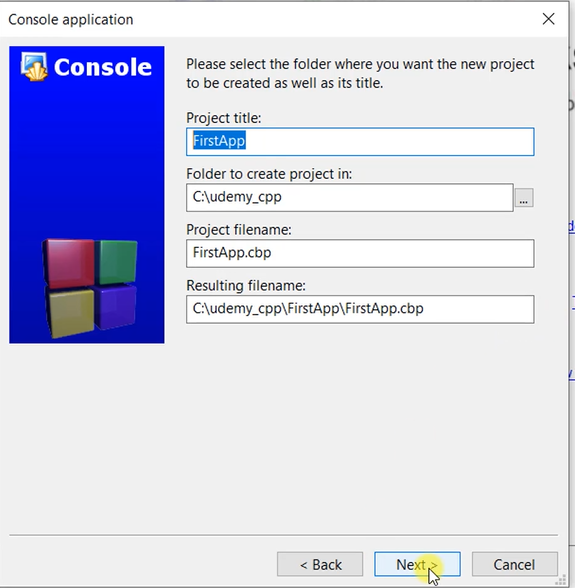
Step 3 – In the “Project title” field, enter a name for your project. You can choose any name you like. In the “Project file location” field, choose a directory where you want to save your project.
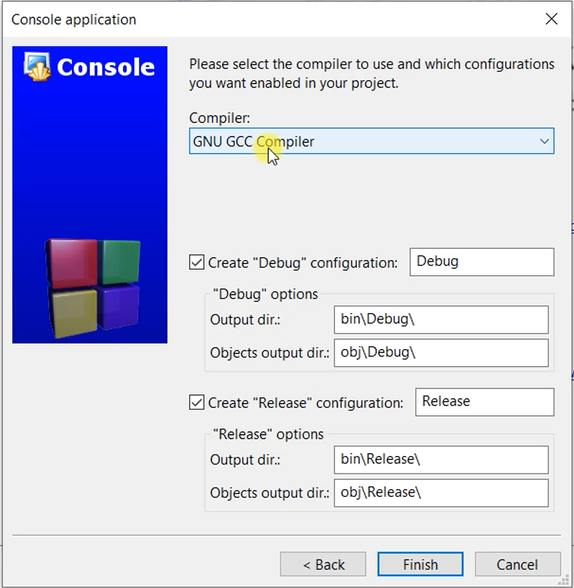
Step 4 – In the “Compiler” field, select the compiler you want to use. By default, Code::Blocks uses GCC. Click “Finish” to create the project.
Once you created the project, this is how it shows in IDE.
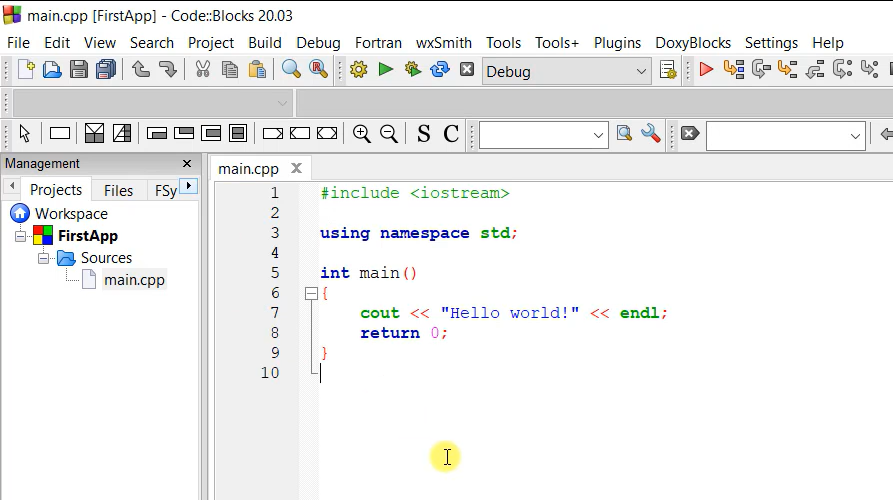
In the “main.cpp” file that opens up, you can start writing your C++ code.
Once you have written your code, click on the “Build” button to compile your code. If there are no errors, you should see a message saying “Build succeeded”. (Ctrl + F9)
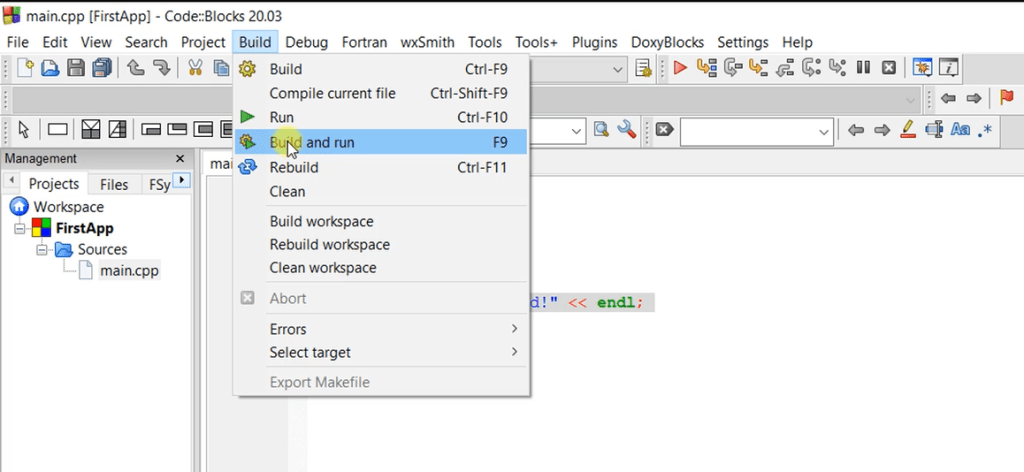
Click on the “Run” button to run your program. The output will be displayed in the “Build Log” window. (Ctrl + F10)
Short cut for Build and run command – F9
Output :
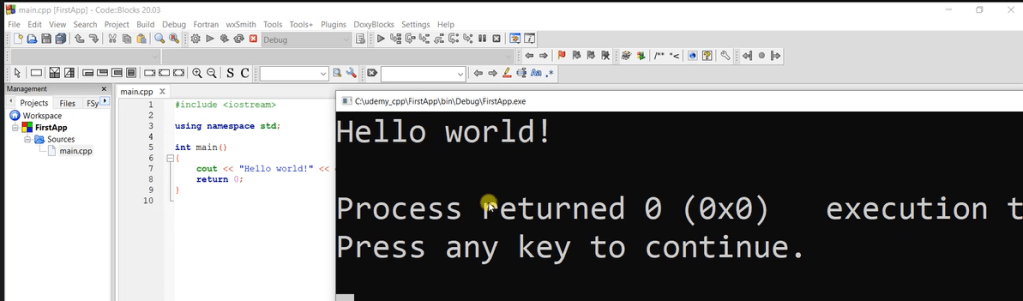
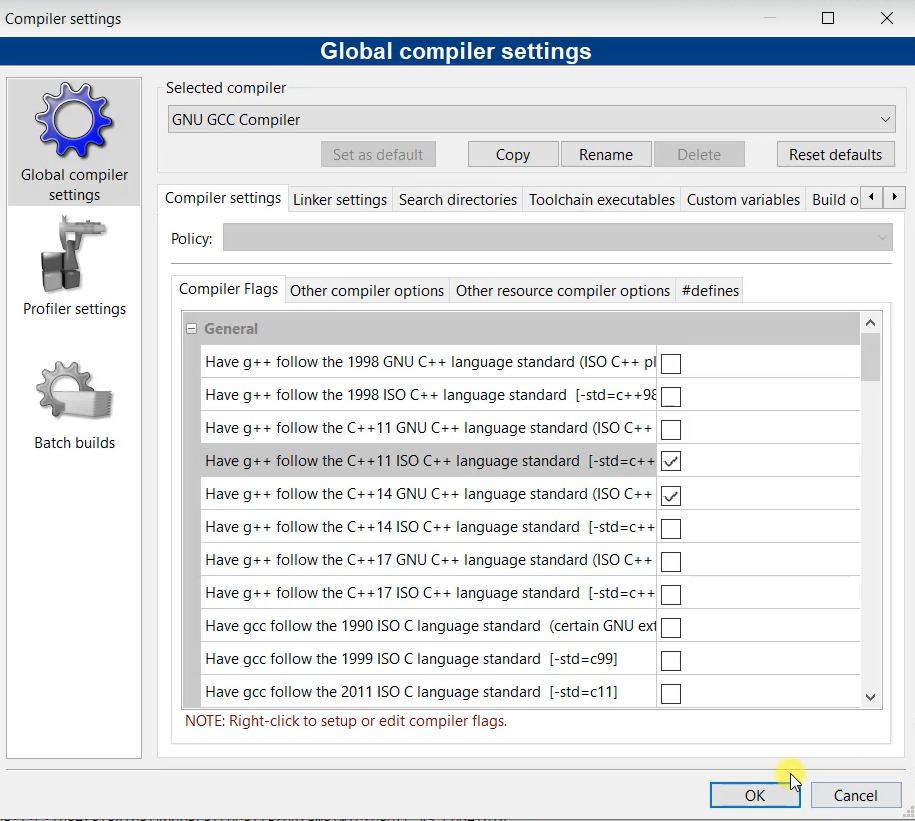
How to set different compiler in Code::Blocks IDE
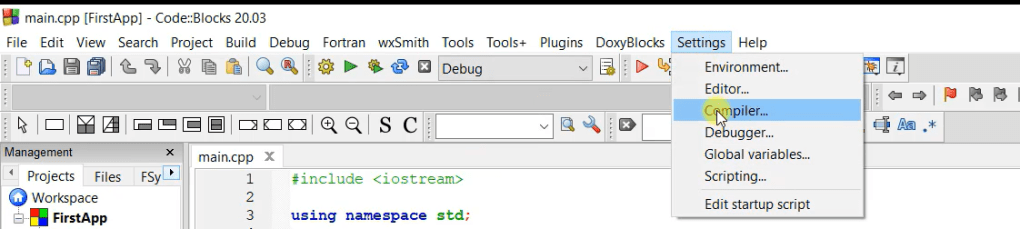
Step 1 – Under Settings – click on Compiler
Step 2 – Click on Toolchain executables – then Auto detect
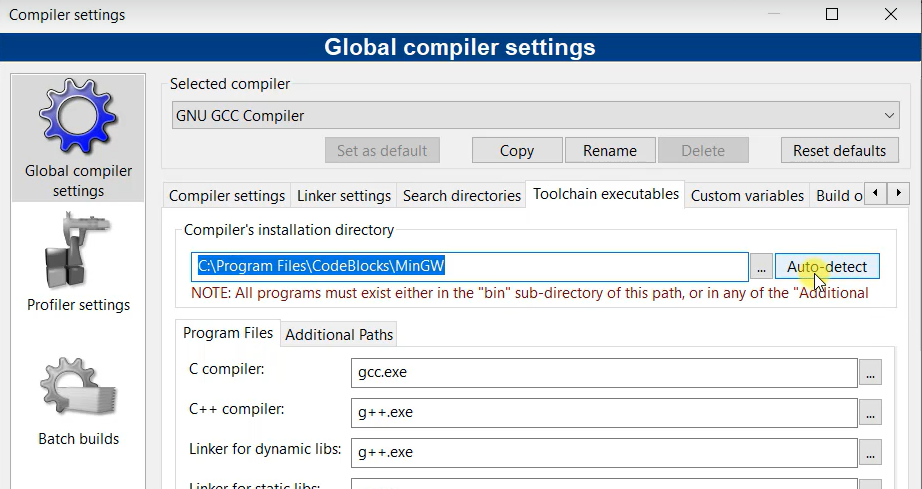
NOTE – If you install Code blocks along with compiler support, then everything is setup automatically.
Step 3 – specifying compiler standard
 Bits, Bytes and Brains