Provides consistent test behavior across machines — no “works on my machine” excuses.
In a Maven/Gradle + JUnit + Mockito + Spring Boot project, there’s no built-in guarantee that one test class runs before another—JUnit treats tests as independent units and (by design) doesn’t define a default execution order.
Configure Maven Surefire Plugin
You can explicitly specify test run order in pom.xml:
In software development, the Prototype design pattern provides a mechanism for creating new objects by cloning existing ones. It allows the creation of object instances without depending on complex initialization logic, resulting in improved performance and flexibility.
The Prototype pattern is a creational design pattern in Java that allows you to create copies (clones) of objects without making the code dependent on their concrete classes. It provides a way to copy existing objects instead of creating new instances from scratch. This can be useful when object creation is expensive or complex, and you want to create variations of objects with different configurations.
Prototype pattern is used when the Object creation is a costly affair and requires a lot of time and resources and you have a similar object already existing. So this pattern provides a mechanism to copy the original object to a new object and then modify it according to our needs. This pattern uses java cloning to copy the object.
Explanation
The pattern defines a prototype interface or abstract class that declares a method for cloning objects, and concrete classes implement this interface to provide their cloning logic.
It would be easy to understand this pattern with an example, suppose we have an Object that loads data from database. Now we need to modify this data in our program multiple times, so it’s not a good idea to create the Object using new keyword and load all the data again from database. So the better approach is to clone the existing object into a new object and then do the data manipulation.
** Prototype design pattern mandates that the Object which you are copying should provide the copying feature. It should not be done by any other class. However whether to use shallow or deep copy of the Object properties depends on the requirements and it’s a design decision.
One example of how this can be useful is if an original object is created with a resource such as a data stream that may not be available at the time that a clone of the object is needed. Another example is if the original object creation involves a significant time commitment, such as reading data from a database or over a network.
Key Features of the Prototype Design Pattern:
Prototype Interface/Abstract Class: The Prototype design pattern defines a prototype interface or abstract class with a clone method like doClone() that enables the creation of new objects by cloning existing ones. The doClone() method returns the object of same type.
Concrete Prototypes: Concrete prototype classes implement the prototype interface/abstract class and provide their cloning logic. They create new instances by copying the data from an existing object.
Client: The client class is responsible for requesting new object instances from the prototypes by invoking the clone method like doClone().
Benefits
Reduces object creation overhead: The Prototype pattern avoids costly object initialization processes by creating new objects through cloning.
Improves performance: Creating new objects by cloning is typically faster than invoking constructors and initializing object properties.
Enhances flexibility: Prototypes allow dynamic creation of objects at runtime based on existing instances, providing flexibility in object creation.
Supports object customization: Cloned objects can be modified individually without affecting the original prototype
Usage in JDK : java.lang.Object#clone ()
Implementing the Prototype Design Pattern in Java
Let’s demonstrate the implementation of the Prototype design pattern using Java code. We’ll create an example of a Shape prototype that allows the creation of different shapes by cloning existing ones.
// Prototype Interface - Shape
public interface Shape extends Cloneable {
    void draw();
    Shape doClone();
}

// Concrete Prototype - Rectangle
public class Rectangle implements Shape {
    @Override
    public void draw() {
        System.out.println("Drawing a rectangle.");
    }

    @Override
    public Shape doClone() {
        try {
            return (Shape) super.clone();
        } catch (CloneNotSupportedException e) {
            return null;
        }
    }
}

// Concrete Prototype - Circle
public class Circle implements Shape {
    @Override
    public void draw() {
        System.out.println("Drawing a circle.");
    }

    @Override
    public Shape doClone() {
        try {
            return (Shape) super.clone();
        } catch (CloneNotSupportedException e) {
            return null;
        }
    }
}

public class Application {
    public static void main(String[] args) {
        Shape rectangle = new Rectangle();
        Shape clonedRectangle = rectangle.doClone();
        rectangle.draw(); // Output: Drawing a rectangle.
        clonedRectangle.draw(); // Output: Drawing a rectangle.

        Shape circle = new Circle();
        Shape clonedCircle = circle.doClone();
        circle.draw(); // Output: Drawing a circle.
        clonedCircle.draw(); // Output: Drawing a circle.
    }
}
The Shape interface serves as the prototype interface, declaring the draw method for drawing shapes and the clone method for creating new instances.
The Rectangle and Circle classes are concrete prototype implementations that implement the Shape interface. They define their own cloning logic by overriding the clone method and provide the implementation for the draw method.
In the above example, we create instances of the Rectangle and Circle shapes. We then clone these objects using their doClone method, resulting in new instances that are independent but identical to the originals. Finally, we call the draw method on both the original and cloned objects, verifying their functionality.
Use cases
When the classes to instantiate are specified at run-time, for example, by dynamic loading; or
To avoid building a class hierarchy of factories that parallels the class hierarchy of products; or
When instances of a class can have one of only a few different combinations of state. It may be more convenient to install a corresponding number of prototypes and clone them rather than instantiating the class manually, each time with the appropriate state.
Implementation of Prototype pattern – real example
package com.rndayala.designpatterns.prototype;

//Product interface
public interface Product extends Cloneable {
	void setName(String name);
	String getName();
	void setPrice(double price);
	double getPrice();
	Product clone();
}


//Concrete product class: Shirt
public class Shirt implements Product {
	private String name;
	private double price;

	public Shirt(String name, double price) {
		this.name = name;
		this.price = price;
	}

	@Override
	public void setName(String name) {
		this.name = name;
	}

	@Override
	public String getName() {
		return name;
	}

	@Override
	public void setPrice(double price) {
		this.price = price;
	}

	@Override
	public double getPrice() {
		return price;
	}

	@Override
	public Product clone() {
		return new Shirt(this.name, this.price);
	}
}


//Concrete product class: Pants
public class Pants implements Product {
	private String name;
	private double price;

	public Pants(String name, double price) {
		this.name = name;
		this.price = price;
	}

	@Override
	public void setName(String name) {
		this.name = name;
	}

	@Override
	public String getName() {
		return name;
	}

	@Override
	public void setPrice(double price) {
		this.price = price;
	}

	@Override
	public double getPrice() {
		return price;
	}

	@Override
	public Product clone() {
		return new Pants(this.name, this.price);
	}
}


//Concrete product class: Shoes
public class Shoes implements Product {
	private String name;
	private double price;

	public Shoes(String name, double price) {
		this.name = name;
		this.price = price;
	}

	@Override
	public void setName(String name) {
		this.name = name;
	}

	@Override
	public String getName() {
		return name;
	}

	@Override
	public void setPrice(double price) {
		this.price = price;
	}

	@Override
	public double getPrice() {
		return price;
	}

	@Override
	public Product clone() {
		return new Shoes(this.name, this.price);
	}
}


// Client code

public class Demo {

	public static void main(String[] args) {

		Product shirt1 = new Shirt("Basic Shirt", 25.0);
		Product pant1 = new Pants("Casual Pants", 40.0);
		Product shoe1 = new Shoes("Sports Shoes", 60.0);

		Product shirt2 = shirt1.clone();
		shirt2.setName("Fancy Shirt");

		Product pant2 = pant1.clone();
		pant2.setPrice(50.0);

		System.out.println("Shirt: " + shirt2.getName() + ", Price: $" + shirt2.getPrice());
        System.out.println("Pants: " + pant2.getName() + ", Price: $" + pant2.getPrice());
        System.out.println("Shoes: " + shoe1.getName() + ", Price: $" + shoe1.getPrice());

	}

}
In this example, we have implemented the Prototype pattern in the context of an e-commerce application. The Product interface acts as the prototype, and the concrete product classes (Shirt, Pants, and Shoes) implement the cloning functionality. This allows for easy creation of variations of products with different configurations without the need to create new objects from scratch.
The Prototype design pattern offers an efficient way to create new objects by cloning existing ones, eliminating the need for complex initialization processes. By utilizing the prototype interface and concrete prototype classes, the pattern enables the creation of new instances while preserving their characteristics. In Java, the Prototype pattern is commonly used when object creation is expensive, or when objects need to be customized based on existing instances.
The Observer design pattern is a behavioral software design pattern that is used to establish a one-to-many dependency between objects. In this pattern, when one object (known as the subject) changes its state, all its dependents (known as observers) are automatically notified and updated accordingly.
It allows multiple objects to be notified of changes in the state of another object without requiring them to know the specifics of the subject.
The Observer Design Pattern is a way for one object, known as the subject, to send updates to multiple other objects, known as observers, when it changes.
An example of this pattern in real life could be a weather service sending updates to different weather apps when the weather changes. The weather service is the subject and the weather apps are the observers.
Explanation
The Observer Design Pattern is a way for one object, known as the subject, to notify multiple other objects, known as observers, about changes in its state. The subject maintains a list of its observers and notifies them when its state changes.
In observer design pattern multiple observer objects registers with a subject for change notification. When the state of subject changes, it notifies the observers.
Objects that listen or watch for change are called observers and the object that is being watched for is called subject.
Pattern involved is also called as publish-subscribe pattern.
Subject provides interface for observers to register and unregister themselves with the subject.
Subject knows who its subscribers are.
Multiple observers can subscribe for notifications.
Subject publishes the notifications.
Subject just sends the notification saying the state has changed. It does not pass any state information.
Once the notification is received from subject, observers call the subject and get data that is changed.
In some implementations, along with the notification, state is also passed so that the observer need not query back to know the status. It is better not to do this way.
There are 4 participants in the Observer pattern:
Subject, which is used to register observers. Objects use this interface to register as observers and also to remove themselves from being observers.
Observer defines an updating interface for objects that should be notified of changes in a subject. All observers need to implement the Observer interface. This interface has a method update (), which gets called when the Subject’s state changes.
ConcreteSubject, stores the state of interest to ConcreteObserver objects. It sends a notification to its observers when its state changes. A concrete subject always implements the Subject interface. The notifyObservers () method is used to update all the current observers whenever the state changes.
ConcreateObserver maintains a reference to a ConcreteSubject object and implements the Observer interface. Each observer registers with a concrete subject to receive updates.
This pattern can be useful in situations where multiple objects need to stay updated with the state of a single object, and the objects do not need to interact directly with each other.
This pattern is widely used in many different applications, such as GUI applications, event-driven systems, and reactive programming. It is a fundamental pattern that can help you to design more flexible and scalable systems.
Benefits
The Observer design pattern offers several benefits, making it a valuable tool in software development. Here are some of the key benefits of using the Observer pattern:
Loose coupling: The Observer pattern promotes loose coupling between the subject and its observers. Observers don’t need to know the specifics of the subject’s implementation; they only rely on the common Observer interface. This reduces the dependencies between classes, making the code more maintainable and flexible.
Extensibility: Introducing new observers becomes easy. You can create new observer classes without modifying the subject. This makes it simple to add new functionalities to a system without affecting existing code.
Reusability: Observers can be reused in different contexts with different subjects. This reusability is possible because of the separation of concerns provided by the Observer pattern.
Event handling: The Observer pattern is commonly used in event-driven systems. When an event occurs, the subject notifies its observers, and they can respond to the event accordingly. This facilitates a clean and efficient way of handling events in the application.
Decoupled UI components: In graphical user interfaces (GUIs), the Observer pattern is often used to ensure that the UI components are decoupled from the underlying data. UI components can register themselves as observers to receive updates when the data changes, allowing for a responsive and synchronized user interface.
Real-time updates: The Observer pattern is useful in scenarios where real-time updates are needed. For example, in chat applications or stock market monitoring systems, observers can be notified immediately when new messages or stock prices arrive.
Maintainability: By separating the concerns of the subject and its observers, the codebase becomes easier to maintain. Changes to one part of the system are less likely to affect other parts, reducing the risk of introducing bugs and making it easier to refactor or add new features.
Scalability: The Observer pattern enables a scalable architecture by allowing multiple observers to be added or removed dynamically at runtime. This is particularly valuable in large applications where different components need to react to changes in a subject independently.
Overall, the Observer design pattern provides a powerful mechanism for building flexible and decoupled systems, enabling better code organization and easier maintenance. It is widely used in various domains, including user interfaces, event handling, and real-time applications.
Implementation
Let us take a blog and subscriber example for observer design pattern sample implementation. Assume that there is a blog and users register to that blog for update. When a new article is posted in the blog, it will send update to the registered users saying a new article is posted. Then the user will access the blog and read the new article posted. In this example, blog is the subject and user is the observer.
package com.rndayala.designpatterns.observable;

import java.util.ArrayList;
import java.util.List;

// Concrete Subject class
public class Blog implements Subject {
	// Concrete Subject maintains list of observers
	private List<Observer> observers = null;
	// this instance variable maintains the state of Concrete subject
	private String blogContent;

	public Blog() {
		System.out.println("Initializing subject(blog)..");
		this.observers = new ArrayList<Observer>();
		blogContent = "";
	}

	@Override
	public void registerObserver(Observer observer) {
		System.out.println("registering an observer!");
		observers.add(observer);
	}

	@Override
	public void unregisterObserver(Observer observer) {
		System.out.println("un-registering an observer!");
		observers.remove(observer);
	}

        // when the state of subject changes, we need to notify observers
	public void postNewArticle(String data) {
		blogContent = data;
		notifyObservers();
	}

	@Override
	public void notifyObservers() {
                // for each observer, call the update() method allowing observer to react to the change in subject state
		for (Observer observer : observers) {
			observer.update(this);
			System.out.println("Observer notified!!");
		}
	}

	@Override
	public Object getUpdate() {
		return blogContent;
	}

        // method to return the list of observers registered with the subject
	public List<Observer> getObserversList() {
		return observers;
	}
}
Concrete observer implementation – User class
package com.rndayala.designpatterns.observable;

public class User implements Observer {
	private Object article;


        // on invocation of update() method, the observer will update its own state.
	@Override
	public void update(Subject subject) {
		article = subject.getUpdate();
	}

	public Object getArticle() {
		return article;
	}

}
Client code – Demo program
package com.rndayala.designpatterns.observable;

import java.util.List;

public class Demo {
	public static void main(String[] args) {
		Blog blog = new Blog();
		User user1 = new User();
		User user2 = new User();
		List<Observer> list = null;

		blog.registerObserver(user1);
		blog.registerObserver(user2);

                // change the state of subject by posting a new article
		blog.postNewArticle("Observer pattern Explained!");

		list = blog.getObserversList();

		for(Observer observer : list) {
			System.out.println("Get content : " + ((User)observer).getArticle());
		}

                // remove an observer
		blog.unregisterObserver(user2);

		blog.postNewArticle("Singleton pattern Explained!");

		list = blog.getObserversList();

		for(Observer observer : list) {
			System.out.println("Get content : " + ((User)observer).getArticle());
		}

	}
}
Output :
Initializing subject(blog)..
registering an observer!
registering an observer!
Observer notified!!
Observer notified!!
Get content : Observer pattern Explained!
Get content : Observer pattern Explained!
un-registering an observer!
Observer notified!!
Get content : Singleton pattern Explained!
When the state of the subject changes, it calls the notifyObservers() method which in turn calls the update method on each of its observers, allowing them to react to the change in subject’s state.
Use cases
The Observer design pattern is typically used in situations where there is a one-to-many relationship between objects and when changes in one object need to be reflected in other objects.
Some common use cases of the Observer pattern are:
1. Implementing a model-view-controller architecture where changes in the model are notified to the views.
2. Implementing event-driven systems, such as user interfaces, where changes in one component trigger updates in other components.
3. Implementing a publish-subscribe system where events are published to multiple subscribers.
4. Implementing a logging system, where changes in the log data need to be notified to multiple log listeners.
5. Implementing a stock ticker system, where changes in the stock prices need to be notified to multiple subscribers.
In all these use cases, the Observer pattern allows the objects to be loosely coupled, so that changes in one object don’t affect the other objects directly. Instead, the changes are notified to the objects that need to be updated.
Observer Design Pattern implementation using Weather station scenario
Here’s a Java code example of the Observer design pattern using the weather station scenario:
When the weather station’s temperature changes, it notifies all its attached observers (TemperatureDisplay and Fan). The TemperatureDisplay then prints the updated temperature, while the Fan turns on or off based on the temperature threshold.
import java.util.ArrayList;
import java.util.List;

// Observer interface
interface Observer {
    void update(int temperature);
}

// Subject
class WeatherStation {
    private List<Observer> observers = new ArrayList<>();
    private int temperature;

    public void attachObserver(Observer observer) {
        observers.add(observer);
    }

    public void detachObserver(Observer observer) {
        observers.remove(observer);
    }

    public void setTemperature(int temperature) {
        this.temperature = temperature;
        notifyObservers();
    }

    // here, while notifying observer, we are sending the state also
    private void notifyObservers() {
        for (Observer observer : observers) {
            observer.update(temperature);
        }
    }
}

// Concrete Observer
class TemperatureDisplay implements Observer {
    @Override
    public void update(int temperature) {
        System.out.println("Temperature Display: " + temperature + " degrees Celsius");
    }
}

// Concrete Observer
class Fan implements Observer {
    @Override
    public void update(int temperature) {
        if (temperature > 25) {
            System.out.println("Fan: Turning on the fan.");
        } else {
            System.out.println("Fan: Turning off the fan.");
        }
    }
}

// Usage
public class Main {
    public static void main(String[] args) {
        WeatherStation weatherStation = new WeatherStation();
        TemperatureDisplay tempDisplay = new TemperatureDisplay();
        Fan fan = new Fan();

        weatherStation.attachObserver(tempDisplay);
        weatherStation.attachObserver(fan);

        weatherStation.setTemperature(20);
        weatherStation.setTemperature(30);
    }
}
Output :
Temperature Display: 20 degrees Celsius
Fan: Turning off the fan.
Temperature Display: 30 degrees Celsius
Fan: Turning on the fan.
This example demonstrates how the WeatherStation subject notifies its attached observers (TemperatureDisplay and Fan) about changes in the temperature, and each observer reacts accordingly.
Builder is a creational design pattern that lets you construct complex objects step by step. The pattern allows you to produce different types and representations of an object using the same construction code.
It decouples the construction process from the object representation, allowing for the step-by-step creation of objects with different configurations.
The need ?
Imagine a complex object that requires laborious, step-by-step initialization of many fields and nested objects. Such initialization code is usually buried inside a monstrous constructor with lots of parameters. Or even worse: scattered all over the client cod
In general, the details of object construction – the constructors, such as instantiating and initializing the components that make up the object, are kept within the object, often as part of its constructor. This type of design closely ties the object construction process with the components that make up the object. This approach is suitable as long as the object under construction is simple and the object construction process is definite and always produces the same representation of the object.
However, this design may not be effective when the object being created is complex and the series of steps constituting the object creation process can be implemented in different ways, thus producing different representations of the object.
If we try to keep all such instantiation steps within the object, the object can become bulky (construction bloat) and less modular. Subsequently, adding a new implementation or making changes to an existing implementation requires changes to the existing code.
The Idea / Intent
The Builder pattern suggests that you extract the object construction code out of its own class and move it to separate objects called builders.
The Builder pattern suggests moving the construction logic out of the object class to a separate class referred to as a builder class. There can be more than one such builder classes, each with different implementations for the series of steps to construct the object. Each builder implementation results in a different representation of the object.
The intent of the Builder Pattern is to separate the construction of a complex object from its representation, so that the same construction process can create different representations.
This type of separation reduces the object size.
Adding a new implementation (i.e., adding a new builder) becomes easier. The object construction process becomes independent of the components that make up the object. This provides more control over the object construction process.
Explanation
Builder doesn’t require products to have a common interface. That makes it possible to produce different products using the same construction process.
Builder pattern allows you to create different configurations of an object step by step, providing a more flexible and readable way to construct objects with many optional parameters.
The main components of the Builder Design Pattern are:
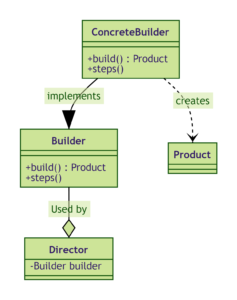
Director(optional) : The Director is responsible for directing the construction of the complex object using the Builder. It controls the order and sequence of the steps required to build the objectusing the Builder. It is not always necessary to have a Director.
Builder Interface / Abstract class : The Builder is an interface or an abstract class that declares the construction steps and methods for creating a complex object. It typically includes methods for setting various attributes and returning the final product.
Concrete Builder: Concrete Builders are implementations of the Builder interface that provide specific implementation details for constructing different parts of the complex object. Each Concrete Builder is responsible for building a particular variant of the object. It also, Provides an interface for retrieving the product.
Product: The Product is the complex object being constructed. It typically contains multiple attributes and configurations. It is the final object resulting from the Builder’s construction process.
The Builder pattern suggests using a dedicated object referred to as a Director, which is responsible for invoking different builder methods required for the construction of the final object.
–> Once the object is constructed, the client object can directly request from the builder the fully constructed object. To facilitate this process, a new method getObject() can be declared in the common Builder interface to be implemented by different concrete builders.
The Builder pattern can be applied when construction of various representations of the product involves similar steps that differ only in the details.
The same construction process can create different representations.
Examples
Usage examples: The Builder pattern is a well-known pattern in Java world. It’s especially useful when you need to create an object with lots of possible configuration options.
Identification: The Builder pattern can be recognized in a class, which has a single creation method and several methods to configure the resulting object. Builder methods often support chaining (for example, someBuilder.setValueA(1).setValueB(2).create()).
Implementation
CarType
package com.rndayala.designpatterns.builder;

// Enum that sepcifies the type of Car
public enum CarType {
    CITY_CAR, SPORTS_CAR, SUV
}
Product feature 1 : Engine
package com.rndayala.designpatterns.builder;

/**
 * Just another feature of a Car product.
 */
public class Engine {
    private final double volume;
    private double mileage;
    private boolean started;

    public Engine(double volume, double mileage) {
        this.volume = volume;
        this.mileage = mileage;
    }

    public void on() {
        started = true;
    }

    public void off() {
        started = false;
    }

    public boolean isStarted() {
        return started;
    }

    public void go(double mileage) {
        if (started) {
            this.mileage += mileage;
        } else {
            System.err.println("Cannot go(), you must start engine first!");
        }
    }

    public double getVolume() {
        return volume;
    }

    public double getMileage() {
        return mileage;
    }
}
Product feature 2 : Transmission
/**
 * Just another feature Car product that specifies the type of Transmission.
 */
public enum Transmission {
    SINGLE_SPEED, MANUAL, AUTOMATIC, SEMI_AUTOMATIC
}
Product feature 3 : TripComputer
package com.rndayala.designpatterns.builder;

/**
 * Just another feature of Car product.
 */
public class TripComputer {

    private Car car;

    public void setCar(Car car) {
        this.car = car;
    }

    public void showFuelLevel() {
        System.out.println("Fuel level: " + car.getFuel());
    }

    public void showStatus() {
        if (this.car.getEngine().isStarted()) {
            System.out.println("Car is started");
        } else {
            System.out.println("Car isn't started");
        }
    }
}
Product feature 4 : GPSNavigator
package com.rndayala.designpatterns.builder;

/**
 * Just another feature of a car.
 */
public class GPSNavigator {
    private String route;

    public GPSNavigator() {
        this.route = "221b, Baker Street, London  to Scotland Yard, 8-10 Broadway, London";
    }

    public GPSNavigator(String manualRoute) {
        this.route = manualRoute;
    }

    public String getRoute() {
        return route;
    }
}
Concrete Product : Car
package com.rndayala.designpatterns.builder;

/**
 * Car is a product class.
 * Product is made up of different components which vary in details for different Product class types.
 */
public class Car {
    private final CarType carType;
    private final int seats;
    private final Engine engine;
    private final Transmission transmission;
    private final TripComputer tripComputer;
    private final GPSNavigator gpsNavigator;
    private double fuel = 0;

    public Car(CarType carType, int seats, Engine engine, Transmission transmission,
               TripComputer tripComputer, GPSNavigator gpsNavigator) {
        this.carType = carType;
        this.seats = seats;
        this.engine = engine;
        this.transmission = transmission;
        this.tripComputer = tripComputer;
        if (this.tripComputer != null) {
            this.tripComputer.setCar(this);
        }
        this.gpsNavigator = gpsNavigator;
    }

    public CarType getCarType() {
        return carType;
    }

    public double getFuel() {
        return fuel;
    }

    public void setFuel(double fuel) {
        this.fuel = fuel;
    }

    public int getSeats() {
        return seats;
    }

    public Engine getEngine() {
        return engine;
    }

    public Transmission getTransmission() {
        return transmission;
    }

    public TripComputer getTripComputer() {
        return tripComputer;
    }

    public GPSNavigator getGpsNavigator() {
        return gpsNavigator;
    }
}
Concrete Product : Manual
package com.rndayala.designpatterns.builder;

/**
 * Car manual is another product. Note that it does not have the same ancestor
 * as a Car. They are not related.
 *
 * Builder doesn’t require products to have a common interface.
 * That makes it possible to produce different products using the same construction process.
 */
public class Manual {
    private final CarType carType;
    private final int seats;
    private final Engine engine;
    private final Transmission transmission;
    private final TripComputer tripComputer;
    private final GPSNavigator gpsNavigator;

    public Manual(CarType carType, int seats, Engine engine, Transmission transmission,
                  TripComputer tripComputer, GPSNavigator gpsNavigator) {
        this.carType = carType;
        this.seats = seats;
        this.engine = engine;
        this.transmission = transmission;
        this.tripComputer = tripComputer;
        this.gpsNavigator = gpsNavigator;
    }

    public String print() {
        String info = "";
        info += "Type of car: " + carType + "\n";
        info += "Count of seats: " + seats + "\n";
        info += "Engine: volume - " + engine.getVolume() + "; mileage - " + engine.getMileage() + "\n";
        info += "Transmission: " + transmission + "\n";
        if (this.tripComputer != null) {
            info += "Trip Computer: Functional" + "\n";
        } else {
            info += "Trip Computer: N/A" + "\n";
        }
        if (this.gpsNavigator != null) {
            info += "GPS Navigator: Functional" + "\n";
        } else {
            info += "GPS Navigator: N/A" + "\n";
        }
        return info;
    }
}
Builder Interface
package com.rndayala.designpatterns.builder;

/**
 * Builder interface defines all possible ways to configure a product.
 * The interface declares all the methods to construct the complex object.
 */
public interface Builder {
    void setCarType(CarType type);
    void setSeats(int seats);
    void setEngine(Engine engine);
    void setTransmission(Transmission transmission);
    void setTripComputer(TripComputer tripComputer);
    void setGPSNavigator(GPSNavigator gpsNavigator);
}
Concrete Builder class : CarBuilder
package com.rndayala.designpatterns.builder;

/**
 * Concrete builders implements all steps defined in the common interface.
 * It provides specific implementations for constructing different parts of the complex object.
 */
public class CarBuilder implements Builder {
    private CarType type;
    private int seats;
    private Engine engine;
    private Transmission transmission;
    private TripComputer tripComputer;
    private GPSNavigator gpsNavigator;

    public void setCarType(CarType type) {
        this.type = type;
    }

    @Override
    public void setSeats(int seats) {
        this.seats = seats;
    }

    @Override
    public void setEngine(Engine engine) {
        this.engine = engine;
    }

    @Override
    public void setTransmission(Transmission transmission) {
        this.transmission = transmission;
    }

    @Override
    public void setTripComputer(TripComputer tripComputer) {
        this.tripComputer = tripComputer;
    }

    @Override
    public void setGPSNavigator(GPSNavigator gpsNavigator) {
        this.gpsNavigator = gpsNavigator;
    }

    // Concrete Builder - provides a method for retrieving the final product.
    public Car getResult() {
        return new Car(type, seats, engine, transmission, tripComputer, gpsNavigator);
    }
}
Concrete Builder class : CarManualBuilder
package com.rndayala.designpatterns.builder;

/**
 * Unlike other Creational patterns, Builder can construct unrelated products,
 * which don't have the common interface.
 *
 * In this case we build a user manual for a car, using the same steps as we
 * built a car. This allows to produce manuals for specific car models,
 * configured with different features.
 */
public class CarManualBuilder implements Builder{
    private CarType type;
    private int seats;
    private Engine engine;
    private Transmission transmission;
    private TripComputer tripComputer;
    private GPSNavigator gpsNavigator;

    @Override
    public void setCarType(CarType type) {
        this.type = type;
    }

    @Override
    public void setSeats(int seats) {
        this.seats = seats;
    }

    @Override
    public void setEngine(Engine engine) {
        this.engine = engine;
    }

    @Override
    public void setTransmission(Transmission transmission) {
        this.transmission = transmission;
    }

    @Override
    public void setTripComputer(TripComputer tripComputer) {
        this.tripComputer = tripComputer;
    }

    @Override
    public void setGPSNavigator(GPSNavigator gpsNavigator) {
        this.gpsNavigator = gpsNavigator;
    }

    public Manual getResult() {
        return new Manual(type, seats, engine, transmission, tripComputer, gpsNavigator);
    }
}
Here, we have two unrelated product classes and their builder classes. The builders of these products follow the same construction steps.
Director
The Director class uses the builder object and specifies the ordering or sequence of steps to construct the object.
package com.rndayala.designpatterns.builder;

/**
 * This Director approach is used when we want to build different unrelated products.
 * However, those products use the same object construction steps.
 * If you observe, the construction methods are not returning any object.
 * Director only specifies the sequence of steps, but does not know what product is being built.
 *
 * Director defines the sequence/order of building steps. It works with a builder object
 * through common Builder interface. Therefore it may not know what product is
 * being built.
 */

public class Director {

    public void constructSportsCar(Builder builder) {
    	// specifies the sequence or order of the steps
        builder.setCarType(CarType.SPORTS_CAR);
        builder.setSeats(2);
        builder.setEngine(new Engine(3.0, 0));
        builder.setTransmission(Transmission.AUTOMATIC);
        builder.setTripComputer(new TripComputer());
        builder.setGPSNavigator(new GPSNavigator());

    }

    public void constructCityCar(Builder builder) {
    	// specifies the sequence or order of the steps
        builder.setCarType(CarType.CITY_CAR);
        builder.setSeats(2);
        builder.setEngine(new Engine(1.2, 0));
        builder.setTransmission(Transmission.SEMI_AUTOMATIC);
        builder.setTripComputer(new TripComputer());
        builder.setGPSNavigator(new GPSNavigator());
    }

    public void constructSUV(Builder builder) {
    	// specifies the sequence or order of the steps
        builder.setCarType(CarType.SUV);
        builder.setSeats(4);
        builder.setEngine(new Engine(2.5, 0));
        builder.setTransmission(Transmission.MANUAL);
        builder.setTripComputer(new TripComputer());
        builder.setGPSNavigator(new GPSNavigator());
    }
}
Demo / Client code
package com.rndayala.designpatterns.builder;

/**
 * Demo class. Everything comes together here.
 */
public class Demo {

    public static void main(String[] args) {
        Director director = new Director();

        // Director gets the concrete builder object from the client
        // (application code). That's because application knows better which
        // builder to use to get a specific product.
        CarBuilder builder = new CarBuilder();
        director.constructSportsCar(builder);

        // The final product is often retrieved from a builder object, since
        // Director is not aware and not dependent on concrete builders and
        // products.
        Car car = builder.getResult();
        System.out.println("Car built:\n" + car.getCarType());


        CarManualBuilder manualBuilder = new CarManualBuilder();

        // Director may know several building recipes.
        director.constructSportsCar(manualBuilder);
        Manual carManual = manualBuilder.getResult();
        System.out.println("\nCar manual built:\n" + carManual.print());
    }

}
Builder Design Pattern implementation using Inner class
The Builder pattern is a creational design pattern that is used to construct complex objects step by step. It separates the construction of the object from its representation, allowing you to create different variations of the same object with a consistent construction process.
When using the Builder pattern with an inner class in Java, the inner class is responsible for building the complex object and accessing the private fields of the outer class. This way, the inner class can set the values of the attributes of the outer class.
Let’s create an example of a complex object called Person using the Builder pattern with an inner class:
// in this builder design pattern implementation, we are using Builder as inner class.
// the inner class has access to private instance variable of the outer class.
public class Person {
    private final String firstName; // mandatory attribute
    private final String lastName;  // mandatory attribute
    private final int age;  // optional
    private final String address;  // optional

    private Person(Builder builder) {
        this.firstName = builder.firstName;
        this.lastName = builder.lastName;
        this.age = builder.age;
        this.address = builder.address;
    }

    // Getter methods (could be omitted for brevity)

    public static class Builder {
        private final String firstName;
        private final String lastName;
        private int age;
        private String address;

        // we set the mandatory attributes using the constructor
        public Builder(String firstName, String lastName) {
            this.firstName = firstName;
            this.lastName = lastName;
        }

        // optional attributes are set using the builder methods
        public Builder age(int age) {
            this.age = age;
            return this;
        }

        public Builder address(String address) {
            this.address = address;
            return this;
        }

        // The build() method in the Builder class constructs the Person object
        // using the private constructor of the outer class.
        public Person build() {
            return new Person(this);
        }
    }
}

// Usage
public class Main {
    public static void main(String[] args) {
        Person person1 = new Person.Builder("John", "Doe")
                .age(30)
                .address("123 Main Street")
                .build();

        Person person2 = new Person.Builder("Jane", "Smith")
                .age(25)
                .build();

        System.out.println(person1); // Person [firstName=John, lastName=Doe, age=30, address=123 Main Street]
        System.out.println(person2); // Person [firstName=Jane, lastName=Smith, age=25, address=null]
    }
}
In this example, the Person class is the complex object we want to construct. It has private fields firstName, lastName, age, and address, and a private constructor that takes a Builder object to set its attributes.
The inner class Builder provides methods to set the optional attributes of the Person object (age and address). The build() method in the Builder class constructs the Person object using the private constructor of the outer class.
By using the Builder pattern with an inner class, we can create a Person object with a clear and expressive API, specifying only the attributes we need, and leaving out the optional ones.
Use cases
Use the Builder pattern when you want your code to be able to create different representations of some product.
The Builder pattern can be applied when construction of various representations of the product involves similar steps that differ only in the details.
same construction steps, but differ in details
The base builder interface defines all possible construction steps, and concrete builders implement these steps to construct particular representations of the product. Meanwhile, the director class guides the order of construction.
Use the Builder pattern when :
The algorithm for creating a complex object should be independent of the parts that make up the object and how they’re assembled.
The construction process must allow different representations for the object that’s constructed.
Here’s a simplified example to illustrate the components of the Builder Design Pattern:
// Product
class Car {
    private String brand;
    private String model;
    private String color;
    private int year;
    // Other attributes...

    public Car(String brand, String model, String color, int year) {
        this.brand = brand;
        this.model = model;
        this.color = color;
        this.year = year;
        // Other attribute assignments...
    }

    // Getters and other methods...
}

// Builder Interface
interface CarBuilder {
    CarBuilder setBrand(String brand);
    CarBuilder setModel(String model);
    CarBuilder setColor(String color);
    CarBuilder setYear(int year);
    Car build();
}

// Concrete Builder
class ConcreteCarBuilder implements CarBuilder {
    private String brand;
    private String model;
    private String color;
    private int year;

    public CarBuilder setBrand(String brand) {
        this.brand = brand;
        return this;
    }

    public CarBuilder setModel(String model) {
        this.model = model;
        return this;
    }

    public CarBuilder setColor(String color) {
        this.color = color;
        return this;
    }

    public CarBuilder setYear(int year) {
        this.year = year;
        return this;
    }

    public Car build() {
        return new Car(brand, model, color, year);
    }
}

// Director
class CarDirector {
    public Car buildCar(CarBuilder builder) {
        return builder.setBrand("Toyota")
                      .setModel("Corolla")
                      .setColor("Silver")
                      .setYear(2023)
                      .build();
    }
}

// Client code
public class Main {
    public static void main(String[] args) {
        CarBuilder carBuilder = new ConcreteCarBuilder();
        CarDirector director = new CarDirector();

        Car car = director.buildCar(carBuilder);
        System.out.println(car);
    }
}
In this example, the Car class represents the Product, the CarBuilder is the Builder interface, the ConcreteCarBuilder is the Concrete Builder, and the CarDirector is the Director. The Client code interacts with the Director to build the complex object using the Builder. The Builder pattern allows you to add new Concrete Builders for different types of products without modifying the Client code or the Director. This flexibility makes it easier to manage and create complex objects with many optional attributes.
An abstract factory is a factory that returns factories. Why is this layer of abstraction useful? A normal factory can be used to create sets of related objects. An abstract factory returns factories. Thus, an abstract factory is used to return factories that can be used to create sets of related objects.
Abstract Factory is a creational design pattern, which solves the problem of creating entire product families without specifying their concrete classes.
** Abstract Factory defines an interface for creating all distinct products but leaves the actual product creation to concrete factory classes. Each factory type corresponds to a certain product variety.
In Abstract Factory pattern, we get rid of if-else block and have a concrete factory class for each sub-class and then an Abstract Factory class that will return the sub-class based on the input factory class.
The client code calls the creation methods of a factory object instead of creating products directly with a constructor call (new operator). Since a factory corresponds to a single product variant, all its products will be compatible.
Explanation – Understanding the pattern
This example illustrates how the Abstract Factory pattern can be used for creating cross-platform UI elements without coupling the client code to concrete UI classes, while keeping all created elements consistent with a selected operating system.
The same UI elements in a cross-platform application are expected to behave similarly, but look a little bit different under different operating systems. Moreover, it’s your job to make sure that the UI elements match the style of the current operating system. You wouldn’t want your program to render macOS controls when it’s executed in Windows.
It works like this: when an application launches, it checks the type of the current operating system. The app uses this information to create a factory object from a class that matches the operating system. The rest of the code uses this factory to create UI elements. This prevents the wrong elements from being created.
The Abstract Factory interface declares a set of creation methods that the client code can use to produce different types of UI elements. Concrete factories correspond to specific operating systems and create the UI elements that match that particular OS.
Benefits
Abstract Factory pattern provides approach to code for interface rather than implementation.
Abstract Factory pattern is “factory of factories” and can be easily extended to accommodate more products, for example we can easily add Material theme product family.
Abstract Factory pattern is robust and avoid conditional logic of Factory pattern.
When to use: A family of related product objects is designed to be used together, and you need to enforce this constraint.
Examples
Usage examples: The Abstract Factory pattern is pretty common in Java code. Many frameworks and libraries use it to provide a way to extend and customize their standard components.
Identification: The pattern is easy to recognize by methods, which return a factory object. Then, the factory is used for creating specific sub-components.
Implementation
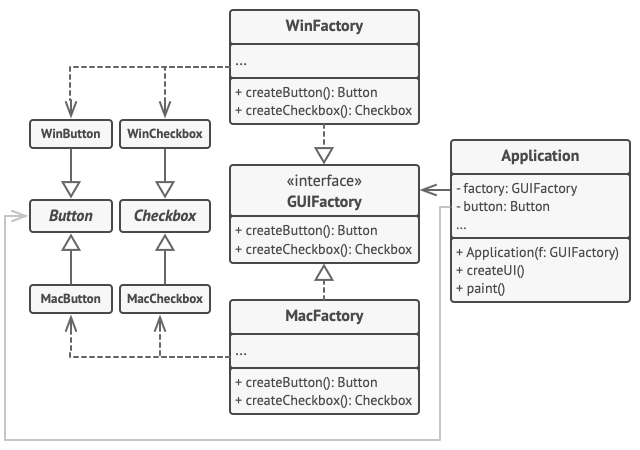
In our example, we create families of cross-platform GUI components and their production. The components, buttons and checkboxes will act as products. They have two variants: macOS and Windows.
The abstract factory defines an interface for creating buttons and checkboxes. There are two concrete factories, which return both products in a single variant.
Client code works with factories and products using abstract interfaces. It makes the same client code working with many product variants, depending on the type of factory object.
buttons: First product hierarchy
Button.java
package com.rndayala.designpatterns.abstractfactory;

/**
 * Abstract Factory assumes that you have several families of products,
 * structured into separate class hierarchies (Button/Checkbox). All products of
 * the same family have the common interface.
 *
 * This is the common interface for buttons family.
 */
public interface Button {
    void render();
}
MacOSButton.java
package com.rndayala.designpatterns.abstractfactory;

/**
 * All products families have the same varieties (MacOS/Windows).
 *
 * This is a MacOS variant of a button.
 */
public class MacOSButton implements Button {

    @Override
    public void render() {
        System.out.println("You have created MacOSButton.");
    }
}
WindowsButton.java
package com.rndayala.designpatterns.abstractfactory;

/**
 * All products families have the same varieties (MacOS/Windows).
 *
 * This is another variant of a button.
 */
public class WindowsButton implements Button {

    @Override
    public void render() {
        System.out.println("You have created WindowsButton.");
    }
}
checkboxes: Second product hierarchy
Checkbox.java
package com.rndayala.designpatterns.abstractfactory;

/**
 * Checkboxes is the second product family. It has the same variants as buttons.
 */
public interface Checkbox {
    void render();
}
MacOSCheckbox.java
package com.rndayala.designpatterns.abstractfactory;

/**
 * All products families have the same varieties (MacOS/Windows).
 *
 * This is a variant of a checkbox.
 */
public class MacOSCheckbox implements Checkbox {

    @Override
    public void render() {
        System.out.println("You have created MacOSCheckbox.");
    }
}
WindowsCheckbox.java
package com.rndayala.designpatterns.abstractfactory;

/**
 * All products families have the same varieties (MacOS/Windows).
 *
 * This is another variant of a checkbox.
 */
public class WindowsCheckbox implements Checkbox {

    @Override
    public void render() {
        System.out.println("You have created WindowsCheckbox.");
    }
}
Abstract factory : GUIFactory.java
package com.rndayala.designpatterns.abstractfactory;

/**
 * Abstract factory knows about all (abstract) product types.
 * It declares a set of creation methods for product types.
 */
public interface GUIFactory {
    Button createButton();
    Checkbox createCheckbox();
}
MacOSFactory.java: Concrete factory (macOS)
package com.rndayala.designpatterns.abstractfactory;

/**
 * Each concrete factory extends basic factory and responsible for creating
 * products of a single variety.
 */
public class MacOSFactory implements GUIFactory {

    @Override
    public Button createButton() {
        return new MacOSButton();
    }

    @Override
    public Checkbox createCheckbox() {
        return new MacOSCheckbox();
    }
}
WindowsFactory.java: Concrete factory (Windows)
package com.rndayala.designpatterns.abstractfactory;

/**
 * Each concrete factory extends basic factory and responsible for creating
 * products of a single variety.
 */
public class WindowsFactory implements GUIFactory {

    @Override
    public Button createButton() {
        return new WindowsButton();
    }

    @Override
    public Checkbox createCheckbox() {
        return new WindowsCheckbox();
    }
}
Client code : Application.java
package com.rndayala.designpatterns.abstractfactory;

/**
 * Factory users don't care which concrete factory they use since they work with
 * factories and products through abstract interfaces.
 */
public class Application {
    private Button button;
    private Checkbox checkbox;

    public Application(GUIFactory factory) {
        button = factory.createButton();
        checkbox = factory.createCheckbox();
    }

    public void render() {
        button.render();
        checkbox.render();
    }
}
App configuration : Demo.java
package com.rndayala.designpatterns.abstractfactory;

/**
 * Demo class. Everything comes together here.
 */
public class Demo {

    /**
     * Application picks the factory type and creates it in run time (usually at
     * initialization stage), depending on the configuration or environment
     * variables.
     */
    private static Application configureApplication() {
        Application app;
        GUIFactory factory;
        String osName = System.getProperty("os.name").toLowerCase();
        if (osName.contains("mac")) {
            factory = new MacOSFactory();
        } else {
            factory = new WindowsFactory();
        }
        app = new Application(factory);
        return app;
    }

    public static void main(String[] args) {
        Application app = configureApplication();
        app.render();
    }
}
Use the Abstract Factory when your code needs to work with various families of related products, but you don’t want it to depend on the concrete classes of those products—they might be unknown beforehand or you simply want to allow for future extensibility.
The Abstract Factory provides you with an interface for creating objects from each class of the product family. As long as your code creates objects via this interface, you don’t have to worry about creating the wrong variant of a product which doesn’t match the products already created by your app.
Factory design pattern is used when we have a super class with multiple sub-classes and based on input, we need to return one of the sub-classes.
This pattern takes out the responsibility of instantiation of a class from client program to the factory class. We can apply Singleton pattern on Factory class or make the factory method static.
Super class in factory pattern can be an interface or a normal java class.
Explanation
The Factory design pattern is a way of creating objects in an object-oriented programming language.
Imagine you have a car factory. The factory makes cars. When you order a car, you specify the type of car you want (e.g. sedan, SUV, sports car, etc.). The factory then builds the car for you and delivers it to you.
Similarly, in the Factory design pattern, you have a factory class that creates objects of different types. When you ask the factory to create an object, you specify the type of object you want. The factory then creates the object for you and returns it to you.
This allows you to separate the process of creating objects from the rest of your code, making it easier to change the way objects are created if needed.
Think of the factory as a kind of “object-making machine.” Instead of writing code to create objects, you tell the factory what you want, and it creates the objects for you. This makes your code easier to read and maintain, and makes it easier to change how objects are created if needed.
The Factory design pattern is often used in situations where client code cannot anticipate the type of objects it needs to create.
The Factory design pattern provides several benefits:
• Abstraction: It separates the implementation details of object creation from the client code, allowing the client code to focus on the task at hand and not the details of object creation.
• Flexibility: The Factory design pattern allows you to add new types of objects to your application without having to modify the client code. This makes it easier to maintain and extend your application.
• Reusability: By encapsulating the details of object creation in a factory class, you can reuse the factory in multiple parts of your application, making your code more modular and easier to maintain. Overall, the Factory
Benefits
Factory pattern provides approach to code for interface rather than implementation.
Factory pattern removes the instantiation of actual implementation classes from client code, making it more robust, less coupled and easy to extend.
Factory pattern provides abstraction between implementation and client classes through inheritance.
valueOf () method in wrapper classes like Boolean, Integer etc.
the Calendarclass utilizes the Factory Method getInstance() to create instances of the Calendar class based on the user’s default locale and timezone. The getInstance() method is static, and it internally determines which specific implementation of Calendar to return based on the locale and timezone settings.
// Get an instance of the default Gregorian calendar
Calendar gregorianCalendar = Calendar.getInstance();
System.out.println("Default Calendar: " + gregorianCalendar.getClass().getName());

// Get an instance of a different calendar system (e.g., Buddhist)
Calendar buddhistCalendar = Calendar.getInstance(java.util.Locale.forLanguageTag("th-TH"));
System.out.println("Buddhist Calendar: " + buddhistCalendar.getClass().getName());
Implementation
It allows the client code to create objects by delegating the responsibility of object instantiation to a factory class.
package com.rndayala.designpatterns.factory;

// interface that defines common functionality to be
// implemented by all related types
public interface Shape {
	void draw();
}

// Concrete class that implements the functionality provided by interface
public class Circle implements Shape {
	@Override
	public void draw() {
		System.out.println("Inside Circle::draw() method.");

	}
}

// Concrete Product classes implementing the Shape interface
public class Rectangle implements Shape {
	@Override
	public void draw() {
		System.out.println("Inside Rectangle::draw() method.");
	}
}

// Concrete Product classes implementing the Shape interface
public class Square implements Shape {
	@Override
	public void draw() {
		System.out.println("Inside Square::draw() method.");

	}
}
Then you define a Factory class that does the instantiation of object based on the type.
package com.rndayala.designpatterns.factory;

// Simple Factory class responsible for creating Shape objects
public class FactoryClass {

	// static Factory method which instantiates the object and returns to client
	public static Shape getShape(String shapeType) {
		if (shapeType == null) {
			return null;
		}

		if (shapeType.equalsIgnoreCase("CIRCLE")) {
			return new Circle();
		} else if (shapeType.equalsIgnoreCase("RECTANGLE")) {
			return new Rectangle();
		} else if (shapeType.equalsIgnoreCase("SQUARE")) {
			return new Square();
		} else if (shapeType.equalsIgnoreCase("TRIANGLE")) {
			// TODO : Add Triangle class which implements Shape interface
		}
		return null;
	}
}
Client code that uses the Factory class :
package com.rndayala.designpatterns.factory;

public class FactoryTest {

	public static void main(String[] args) {
		// create objects of  the Shape interface by calling the getShape method
		// and passing the appropriate String argument.
		// Type of object to create is determined at runtime by user.
		// NOTE - We code against interface. Higher level modules doesn't depend on lower level classes.
		Shape shape = FactoryClass.getShape("Circle");
		shape.draw();

		shape = FactoryClass.getShape("Square");
		shape.draw();

		shape = FactoryClass.getShape("Rectangle");
		shape.draw();
	}
}
Implementations of the Factory Design Pattern in Java provide a way to encapsulate object creation, allowing the client code to focus on using the objects rather than being concerned with how they are created.
Simple Factory Method
In the simple factory method, a separate factory class is responsible for creating instances of various concrete classes that share a common superclass or interface.
// Interface for the Product objects
interface Product {
    void doSomething();
}

// Concrete Product classes implementing the Product interface
class ConcreteProductA implements Product {
    public void doSomething() {
        System.out.println("Doing something in ConcreteProductA.");
    }
}

class ConcreteProductB implements Product {
    public void doSomething() {
        System.out.println("Doing something in ConcreteProductB.");
    }
}

// Simple Factory class responsible for creating Product objects
class ProductFactory {

    // static factory method
    public static Product createProduct(String type) {
        switch (type) {
            case "A":
                return new ConcreteProductA();
            case "B":
                return new ConcreteProductB();
            default:
                throw new IllegalArgumentException("Invalid product type: " + type);
        }
    }
}

// Client code
public class Main {
    public static void main(String[] args) {
        Product productA = ProductFactory.createProduct("A");
        productA.doSomething(); // Output: Doing something in ConcreteProductA.

        Product productB = ProductFactory.createProduct("B");
        productB.doSomething(); // Output: Doing something in ConcreteProductB.
    }
}
Implementations of the Factory Design Pattern in Java provide a way to encapsulate object creation, allowing the client code to focus on using the objects rather than being concerned with how they are created.
Use cases
Some common use cases of the Factory Pattern include:
When a class cannot anticipate the type of objects it needs to create
When a class wants its subclasses to specify the objects it creates
When classes delegate responsibility to one of several helper subclasses, and you want to localize the knowledge of which helper subclass is the delegate.
Examples of situations where the Factory Pattern can be used include:
when creating objects for UI elements, such as buttons or panels, based on user input or configuration data
when implementing a plugin architecture where objects of different types can be created based on user-selected options
when managing the creation of objects that are part of a larger system, such as creating database connections based on configuration data.
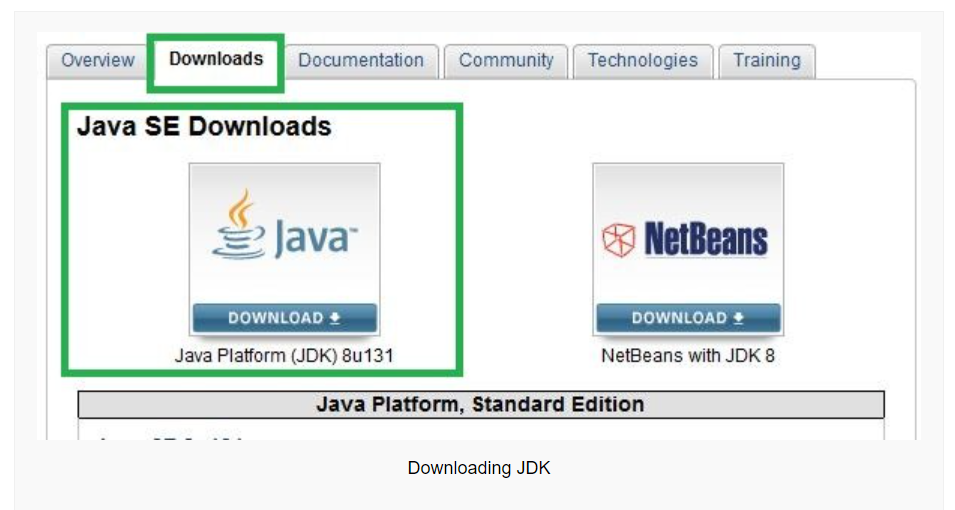
by clicking on the “Downloads” tab. Select the “Java SE Platforms” and “Java” button.
Pick the Java SE Development Kit X Downloads, where “X” is the major version like 8, you will have the minor updates marked as say “u131“, etc.
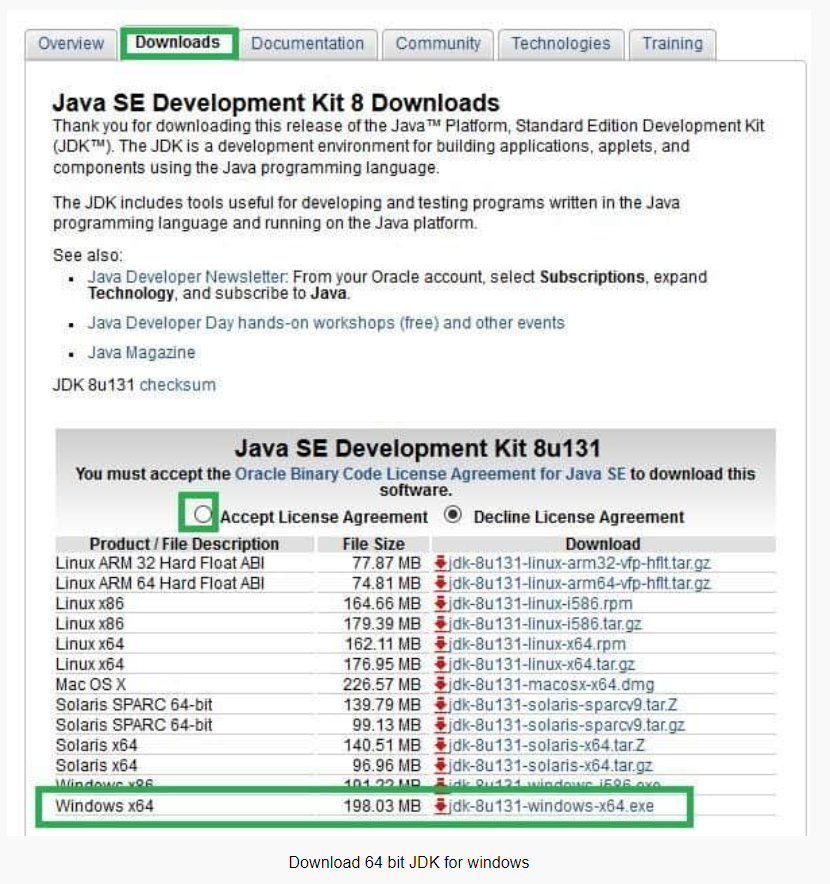
Make sure that you download and install the right version for the operating system on which you will be running — for example Windows (32 bit or 64 bit), Linux, Solaris, MAC, etc. You will need both the JDK and the JRE.
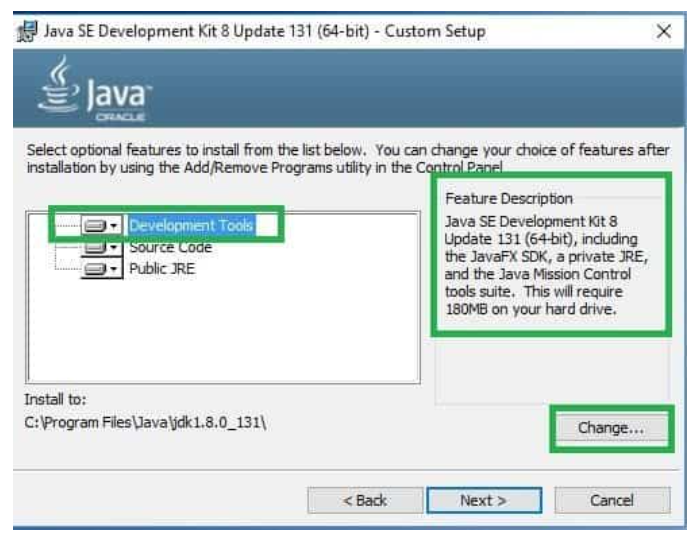
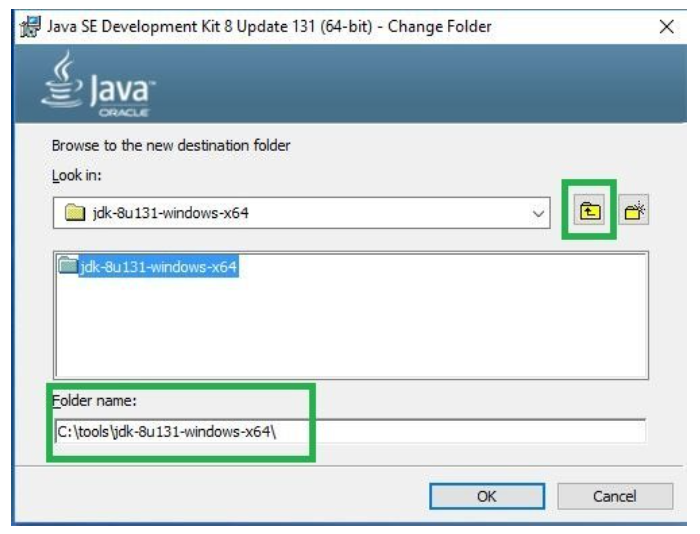
Double click on the downloaded file “jdk-8u131-windows-x64.exe”, and follow the installation prompts and choose to change to “C:\tools\jdk-8u131-windows-x64” or whatever the folder you chose earlier.
Verify Java Installation
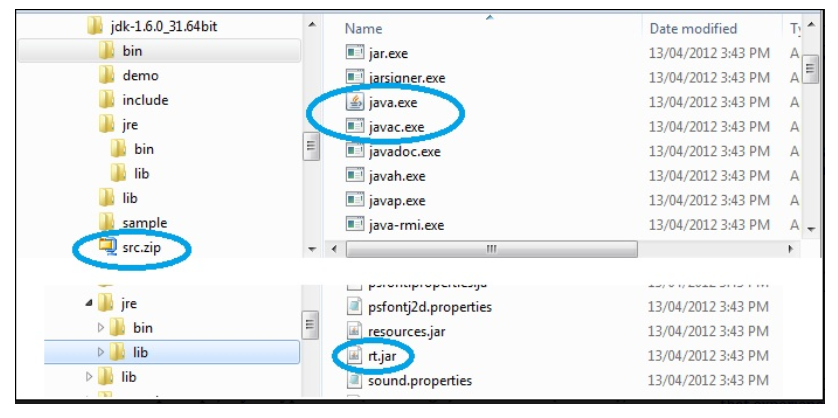
Step 1: Go to the installation folder, for example “C:\tools\jdk-8u131-windows-x64” to verify the presence of relevant files required for compiling & running Java.
The javac.exe is the compiler that converts a source file (e.g. HelloWorld.java) to a byte code file (e.g. HelloWorld.class). The java.exe is the run-time command to execute a program (i.e. java HelloWorld). The src.zip is where all the Java API (i.e. Java library) source (i.e. .java) files are located and rt.jar is where the Java API run-time class files (i.e. class) are located.
In Oracle database, the “open resetlogs” command is used to open a database
after performing incomplete recovery or
after restoring a backup of the database.
Suppose you have a database that was backed up at time T1. After the backup was taken, changes were made to the database up to time T2. Now suppose that due to some issue, the database became corrupt and you had to restore it from the T1 backup. To bring the database up to date with the changes made after the backup was taken, you perform a recovery operation using redo logs generated between T1 and T2.
Once the recovery operation is complete, you would use the “open resetlogs” command to indicate that the database should be opened with a new redo log file. Here is an example SQL statement that you would use to open the database with resetlogs:
SQL> ALTER DATABASE OPEN RESETLOGS;
This command would create a new redo log file, reset the online redo log sequence numbers to 1, and update the control file and data dictionary to indicate that the database is now open with the new redo log file. After executing this command, the database would be fully recovered and ready for use.
The “open resetlogs” command is used to indicate that the recovery operation is complete and that the database should be opened with a new redo log file.
The “open resetlogs” command performs the following actions:
It creates a new redo log file and resets the online redo log sequence numbers to 1.
It updates the control file to reflect the new log file sequence number.
It updates the data dictionary to indicate that the database is now open.
Note that the “open resetlogs” command should only be used after performing incomplete recovery or restoring a backup of the database. Using this command at any other time can result in data loss or corruption.
What are redologs ?
Imagine you are building a Lego castle, and as you build it, you keep a notebook where you write down all the pieces you use and where you put them. This way, if something goes wrong, you can look at your notebook and see what you did.
In a similar way, when you use a database like Oracle, the database keeps track of all the changes that are made to it in a file called a “redo log”. The redo log is like a notebook where the database writes down all the changes made to the database, such as adding new data, deleting data, or updating existing data.
The redo log is important because if something goes wrong with the database, such as a power failure or a software error, the database can use the redo log to “replay” all the changes made to the database since the last backup. This way, the database can recover all the changes that were made and bring itself up to date, just like you can use your notebook to rebuild your Lego castle if something goes wrong.
As changes are made to the database, the database writes the changes to the redo log files in a circular fashion. When the redo log file is full, the database switches to the next redo log file and continues writing changes to it. This process continues until all the redo log files have been used, at which point the database goes back to the beginning of the first redo log file and starts overwriting the oldest changes.
redo logs in an Oracle database are stored on disk in a location specified by the database administrator, and they are written to in a circular fashion as changes are made to the database.
In summary, the redo log is a file that keeps track of all the changes made to a database, and it is used to recover changes if something goes wrong with the database.
Some common IPC mechanisms include pipes, sockets, shared memory, message queues, signals and semaphores.
Linux provides several techniques for inter-process communication (IPC) between processes. Some of the commonly used IPC techniques in Linux are:
Pipes: A pipe is a communication channel between two processes that enables one process to send data to the other process. Pipes are implemented using a shared file descriptor and can be either named or unnamed.
–> Usage : Pipes are commonly used in command-line interfaces to connect the output of one command to the input of another command. For example, the “ls | grep” command uses a pipe to send the output of the “ls” command to the input of the “grep” command.
A pipe consists of two file descriptors: one for writing and one for reading. A process can write data to the pipe using the write() system call, and another process can read data from the pipe using the read() system call.
Message queues: Message queues are a mechanism for exchanging messages between processes. They are implemented using a queue data structure and can be used to send and receive messages of a fixed size.
Message queues allow processes to send and receive messages in a queue-like manner.
To use message queues, a process first creates a message queue and then sends messages to it or receives messages from it.
The messages can be of variable length and contain any data that can be represented in memory.
–> Usage : Message queues are often used in distributed systems where multiple processes running on different machines. Here, we can use message queues to send messages between different nodes in a distributed system.
Shared memory: Shared memory allows multiple processes to share a segment of memory that is created by one process. This allows processes to communicate and share data more efficiently.
In shared memory IPC, processes can access and modify the same region of memory.
–> Usage : This mechanism is often used in high-performance computing applications, where multiple processes need to share large amounts of data. For example, a database server can use shared memory to allow multiple database clients to access the same data.
Shared memory provides a fast and efficient IPC mechanism because data can be accessed directly without any copying.
However, it can be challenging to implement correctly because of the need for synchronization and protection against race conditions.
To use shared memory, a process first creates a shared memory segment and then attaches to it. Other processes can attach to the same shared memory segment to share data.
Sockets: Sockets provide a means of communication between processes over a network. They allow processes to send and receive data to and from other processes running on remote systems.
A socket is a bidirectional communication mechanism that allows processes to send and receive data over a network.
–> Usage : Sockets are commonly used in client-server applications, where a server listens for incoming connections and handles requests from multiple clients. For example, a web server can use sockets to handle HTTP requests from multiple clients.
A socket consists of an IP address, a port number, and a communication protocol.
To use sockets, a process first creates a socket and then sends data to it or receives data from it.
Semaphores: Semaphores are used to manage access to shared resources and synchronize activities between processes. They provide a mechanism for controlling access to shared resources and preventing conflicts that can arise from concurrent access.
Signals: these can be used to notify processes of specific events or to request that a process perform a certain action. This is event-driven technique.
These IPC techniques can be used to implement various types of inter-process communication in Linux, including synchronization, data transfer, and message passing.
The choice of IPC technique depends on the specific requirements of the application and the nature of the data being exchanged.