Setting up Java step by step tutorial

This is mainly for the beginners of Java to get started with Maven, and eclipse.

Set up folders

1) C:\tools to install Java development tools like JDK, Maven, Eclipse IDE, etc.
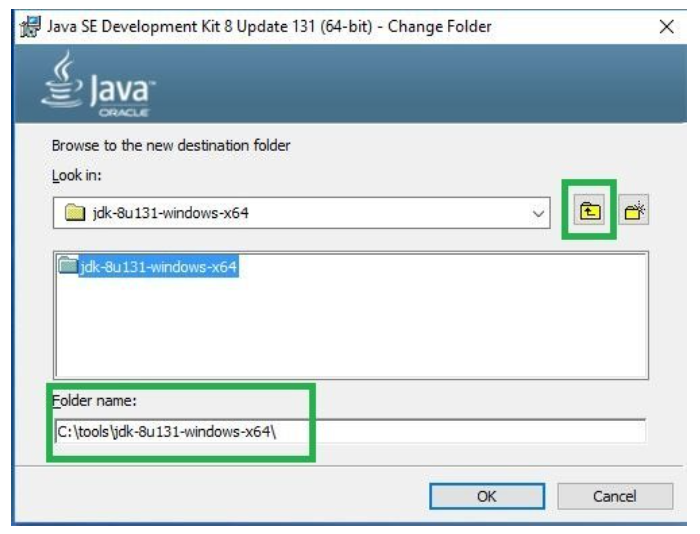
Create a sub-folder “jdk-8u131-windows-x64” to install JDK “8u131”.

2) C:\projects to store your Java projects.

3) C:\scripts to store any DOS or Unix scripts.

Pick your own folder. It could be under “C:\users\john\tools\java\jdk-8u131-windows-x64”, “C:\users\john\projects”, etc.

It is important to separate “tools“, “projects“, and “scripts“.

Install Java

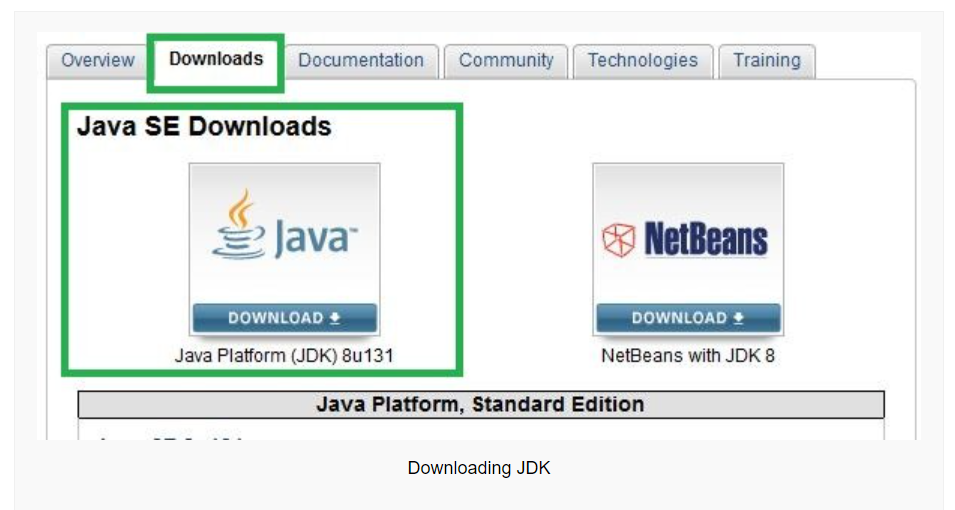
Step 1: Download and install latest “Java SE Development Kit” (i.e. JDK) version “X” from

http://www.oracle.com/technetwork/java/javase/overview/index.html

by clicking on the “Downloads” tab. Select the “Java SE Platforms” and “Java” button.

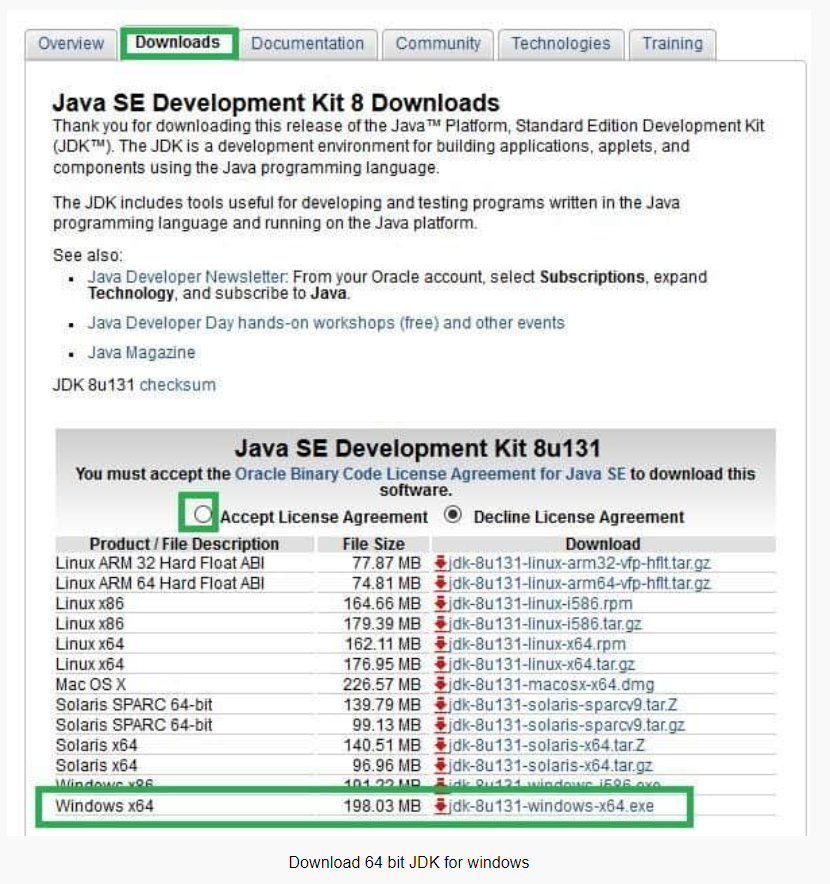
Pick the Java SE Development Kit X Downloads, where “X” is the major version like 8, you will have the minor updates marked as say “u131“, etc.

Make sure that you download and install the right version for the operating system on which you will be running — for example Windows (32 bit or 64 bit), Linux, Solaris, MAC, etc. You will need both the JDK and the JRE.

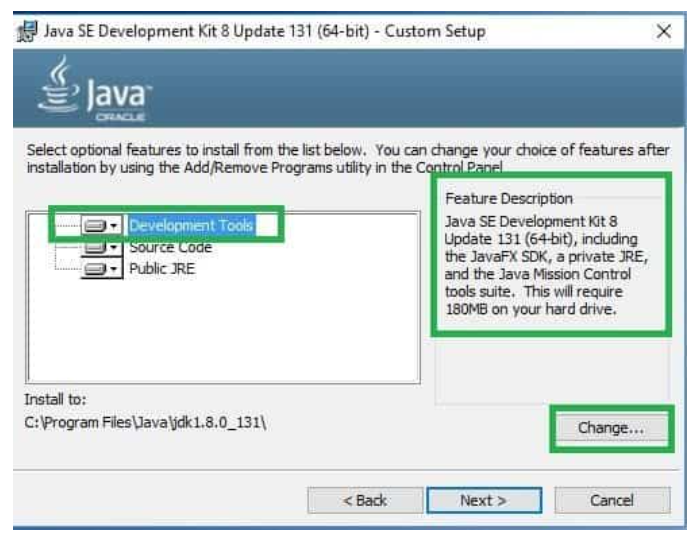
Double click on the downloaded file “jdk-8u131-windows-x64.exe”, and follow the installation prompts and choose to change to “C:\tools\jdk-8u131-windows-x64” or whatever the folder you chose earlier.

Verify Java Installation

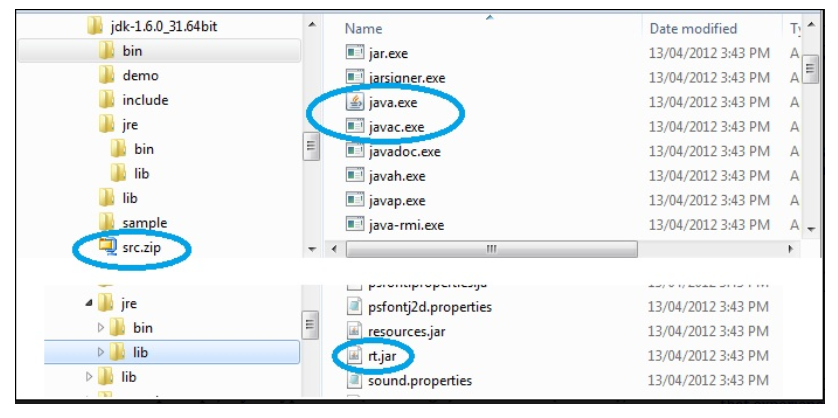
Step 1: Go to the installation folder, for example “C:\tools\jdk-8u131-windows-x64” to verify the presence of relevant files required for compiling & running Java.

The javac.exe is the compiler that converts a source file (e.g. HelloWorld.java) to a byte code file (e.g. HelloWorld.class). The java.exe is the run-time command to execute a program (i.e. java HelloWorld). The src.zip is where all the Java API (i.e. Java library) source (i.e. .java) files are located and rt.jar is where the Java API run-time class files (i.e. class) are located.

Java – JDBC example program

I had one usecase and for which I wrote this program. This program is compatible with JRE1.7.

The program makes a database connection using JDBC for oracle database and for every 200 milliseconds, it queries the database table for data. After 15 secs, the program exits.

TimerTask class used for running the sql query for every 200 milliseconds.

import java.sql.*;
import java.util.Timer;
import java.util.TimerTask;
import java.util.Date;
import java.util.TimeZone;
import java.text.SimpleDateFormat;


public class OracleDBConnection extends TimerTask {
   Connection conn = null;
   Timer timer = null;
   Statement stmt = null;
   ResultSet rs = null;
   int count = 0;
   int period = 200; // interval period
   int iteration = 1;

   int duration = 15000; // duration in milliseconds

   public OracleDBConnection(Connection p_connection, Timer p_timer) {
       conn = p_connection;
       timer = p_timer;
   }

   public void run() {
      System.out.println("Code executed every 200 milliseconds : " + iteration);
      try {
         // Execute a SQL query using the existing connection
         stmt = conn.createStatement();
         rs = stmt.executeQuery("select * from <table> fetch first 2 rows only");

         // Process the query results
         while (rs.next()) {
            // Retrieve data from the query results
            String data = rs.getString("user_name");

           // Do something with the retrieved data
            System.out.println(data);
         }
      } catch (SQLException e) {
         e.printStackTrace();
      } finally {
         // Close the database resources
         try {
            if (rs != null) rs.close();
            if (stmt != null) stmt.close();
         } catch (SQLException e) {
            e.printStackTrace();
         }
      }
      iteration++;
      count++;
      if (count * period >= duration) {
         timer.cancel(); // stop the timer when duration is reached
         Date now = new Date();
         SimpleDateFormat formatter = new SimpleDateFormat("yyyy-MM-dd HH:mm:ss");
         formatter.setTimeZone(TimeZone.getDefault());
         String formattedDateTime = formatter.format(now);
         System.out.println("Completed DB query statements execution at time : " + formattedDateTime);
      }
   }
}

Main program that creates the connection and passes it to TimerTask object.

import java.util.TimeZone;
import java.text.SimpleDateFormat;

public class OracleDBConnectionTest {
    public static void main(String[] args) throws InterruptedException {
        Connection conn = null;
        String url = "jdbc:oracle:thin:@<connectionString>";
        String username = "username";
        String password = "password";

        try {

            Timer timer = new Timer();

            // Load the Oracle JDBC driver
            DriverManager.registerDriver (new oracle.jdbc.OracleDriver()) ;

            // Connect to the Oracle database
            conn = DriverManager.getConnection(url, username, password);

            // Create a TimerTask to execute the OracleDBConnection every 10 seconds
            TimerTask task = new OracleDBConnection(conn, timer);

            // Get current date and time in local time zone
            Date now = new Date();
            SimpleDateFormat formatter = new SimpleDateFormat("yyyy-MM-dd HH:mm:ss");
            formatter.setTimeZone(TimeZone.getDefault());
            String formattedDateTime = formatter.format(now);

            System.out.println("Starting DB Query Statements at time : " + formattedDateTime);

            timer.schedule(task, 0, 200);

            Thread.sleep(20000);

            now = new Date();
            formattedDateTime = formatter.format(now);

            System.out.println("Exiting main program at time : " + formattedDateTime);

        } catch (SQLException e) {
            e.printStackTrace();

        } finally {
            // Close the database connection
            try {
                if (conn != null) {
                    System.out.println("Closing the connection");
                    conn.close();
                }
            } catch (SQLException e) {
                e.printStackTrace();
            }
        }
    }
}

Chef Adding a user to organization

In Chef, if you have created an organization and want to add user to that, here is the command :

sudo orc-server-ctl org-user-add <org> <user>

Check whether a particular user has access to an organization :

sudo knife raw /association_requests -s "https://<hostfqdn>/organizations/myorg" -u admin -k /home/abcd/.chef/admin.pem

Some of the commands related to org or user related :

org-create

    Create an organization in the Chef Infra Server.

  org-delete

    Delete an organization in the Chef Infra Server.

  org-list

    List all organizations in the Chef Infra Server.

  org-show

    Show an organization in the Chef Infra Server.

  org-user-add

    Associate a user with an organization.

  org-user-remove

    Dissociate a user with an organization.

  password

    Set a user’s password or System Recovery Password.

  user-create

    Create a user in the Chef Infra Server.

  user-delete

    Delete a user in the Chef Infra Server.

  user-edit

    Edit a user in the Chef Infra Server.

  user-list

    List all users in the Chef Infra Server.

  user-show

    Show a user in the Chef Infra Server.

Oracle Database – open resetlogs, redo logs

open resetlogs command

In Oracle database, the “open resetlogs” command is used to open a database

  • after performing incomplete recovery or
  • after restoring a backup of the database.

Suppose you have a database that was backed up at time T1. After the backup was taken, changes were made to the database up to time T2. Now suppose that due to some issue, the database became corrupt and you had to restore it from the T1 backup. To bring the database up to date with the changes made after the backup was taken, you perform a recovery operation using redo logs generated between T1 and T2.

Once the recovery operation is complete, you would use the “open resetlogs” command to indicate that the database should be opened with a new redo log file. Here is an example SQL statement that you would use to open the database with resetlogs:

SQL> ALTER DATABASE OPEN RESETLOGS;

This command would create a new redo log file, reset the online redo log sequence numbers to 1, and update the control file and data dictionary to indicate that the database is now open with the new redo log file. After executing this command, the database would be fully recovered and ready for use.

The “open resetlogs” command is used to indicate that the recovery operation is complete and that the database should be opened with a new redo log file.

The “open resetlogs” command performs the following actions:

  • It creates a new redo log file and resets the online redo log sequence numbers to 1.
  • It updates the control file to reflect the new log file sequence number.
  • It updates the data dictionary to indicate that the database is now open.

Note that the “open resetlogs” command should only be used after performing incomplete recovery or restoring a backup of the database. Using this command at any other time can result in data loss or corruption.

What are redologs ?

Imagine you are building a Lego castle, and as you build it, you keep a notebook where you write down all the pieces you use and where you put them. This way, if something goes wrong, you can look at your notebook and see what you did.

In a similar way, when you use a database like Oracle, the database keeps track of all the changes that are made to it in a file called a “redo log”. The redo log is like a notebook where the database writes down all the changes made to the database, such as adding new data, deleting data, or updating existing data.

The redo log is important because if something goes wrong with the database, such as a power failure or a software error, the database can use the redo log to “replay” all the changes made to the database since the last backup. This way, the database can recover all the changes that were made and bring itself up to date, just like you can use your notebook to rebuild your Lego castle if something goes wrong.

As changes are made to the database, the database writes the changes to the redo log files in a circular fashion. When the redo log file is full, the database switches to the next redo log file and continues writing changes to it. This process continues until all the redo log files have been used, at which point the database goes back to the beginning of the first redo log file and starts overwriting the oldest changes.

redo logs in an Oracle database are stored on disk in a location specified by the database administrator, and they are written to in a circular fashion as changes are made to the database.

In summary, the redo log is a file that keeps track of all the changes made to a database, and it is used to recover changes if something goes wrong with the database.

Perl Dumper

In Perl, you can use the Data::Dumper module to dump data structures into a string. Here’s an example:

use Data::Dumper;

my $data = { 
    name => 'John Doe',
    age => 35,
    hobbies => ['reading', 'swimming', 'traveling'],
};

my $string = Dumper($data);
print $string;

The output of this code will be a string representation of the data structure:

$VAR1 = {
          'name' => 'John Doe',
          'hobbies' => [
                         'reading',
                         'swimming',
                         'traveling'
                       ],
          'age' => 35
        };

You can also use the Dumper() function to dump other types of data structures, such as arrays or scalars.

Reference Udemy courses

Scrum

https://www.udemy.com/course-dashboard-redirect/?course_id=2809631

C

https://www.udemy.com/course-dashboard-redirect/?course_id=2800976 – Advanced C Programming

https://www.udemy.com/course-dashboard-redirect/?course_id=3408682 – Pointers and Memory management

C++

https://www.udemy.com/course-dashboard-redirect/?course_id=2987082 – C++20 Masterclass

https://www.udemy.com/course-dashboard-redirect/?course_id=3515300 – Mastering 4 critical skills

https://www.udemy.com/course-dashboard-redirect/?course_id=1706344 – C++ step by step

Project Management

https://www.udemy.com/course-dashboard-redirect/?course_id=2132982 – Manage ur IT Project

Perl

https://www.udemy.com/course-dashboard-redirect/?course_id=965166

Git command to add all modified files

The Git command to add all modified or deleted files to the staging area is:

git add -u

The -u flag tells Git to update the index with all changes to tracked files, including modifications and deletions. This command will not add any new files that are not currently tracked by Git.

Alternatively, you can use the following command to add all modified, deleted, and untracked files to the staging area:

git add -A

–> The -A flag tells Git to add all changes to tracked files and all untracked files to the staging area. This command is useful if you have added new files that are not currently tracked by Git, and you want to add them to the staging area along with any modifications or deletions.

It’s important to note that adding files to the staging area is just the first step in committing changes to your Git repository. After adding files to the staging area, you will need to use the git commit command to create a new commit with your changes.

How do we achieve IPC ? Different techniques ?

Some common IPC mechanisms include pipes, sockets, shared memory, message queues, signals and semaphores.

Linux provides several techniques for inter-process communication (IPC) between processes. Some of the commonly used IPC techniques in Linux are:

  • Pipes: A pipe is a communication channel between two processes that enables one process to send data to the other process. Pipes are implemented using a shared file descriptor and can be either named or unnamed.
    • –> Usage : Pipes are commonly used in command-line interfaces to connect the output of one command to the input of another command. For example, the “ls | grep” command uses a pipe to send the output of the “ls” command to the input of the “grep” command.
    • A pipe consists of two file descriptors: one for writing and one for reading. A process can write data to the pipe using the write() system call, and another process can read data from the pipe using the read() system call.

  • Message queues: Message queues are a mechanism for exchanging messages between processes. They are implemented using a queue data structure and can be used to send and receive messages of a fixed size.
    • Message queues allow processes to send and receive messages in a queue-like manner.
    • To use message queues, a process first creates a message queue and then sends messages to it or receives messages from it.
    • The messages can be of variable length and contain any data that can be represented in memory.
    • –> Usage : Message queues are often used in distributed systems where multiple processes running on different machines. Here, we can use message queues to send messages between different nodes in a distributed system.
  • Shared memory: Shared memory allows multiple processes to share a segment of memory that is created by one process. This allows processes to communicate and share data more efficiently.
    • In shared memory IPC, processes can access and modify the same region of memory.
    • –> Usage : This mechanism is often used in high-performance computing applications, where multiple processes need to share large amounts of data. For example, a database server can use shared memory to allow multiple database clients to access the same data.
    • Shared memory provides a fast and efficient IPC mechanism because data can be accessed directly without any copying.
    • However, it can be challenging to implement correctly because of the need for synchronization and protection against race conditions.
    • To use shared memory, a process first creates a shared memory segment and then attaches to it. Other processes can attach to the same shared memory segment to share data.
  • Sockets: Sockets provide a means of communication between processes over a network. They allow processes to send and receive data to and from other processes running on remote systems.
    • A socket is a bidirectional communication mechanism that allows processes to send and receive data over a network.
    • –> Usage : Sockets are commonly used in client-server applications, where a server listens for incoming connections and handles requests from multiple clients. For example, a web server can use sockets to handle HTTP requests from multiple clients.
    • A socket consists of an IP address, a port number, and a communication protocol.
    • To use sockets, a process first creates a socket and then sends data to it or receives data from it.

  • Semaphores: Semaphores are used to manage access to shared resources and synchronize activities between processes. They provide a mechanism for controlling access to shared resources and preventing conflicts that can arise from concurrent access.

  • Signals: these can be used to notify processes of specific events or to request that a process perform a certain action. This is event-driven technique.

These IPC techniques can be used to implement various types of inter-process communication in Linux, including synchronization, data transfer, and message passing.

The choice of IPC technique depends on the specific requirements of the application and the nature of the data being exchanged.

Little endian v/s Big endian

Little endian and big endian are two ways of storing multibyte data types (such as integers and floating-point numbers) in computer memory.

In little endian byte order, the least significant byte of a multibyte value is stored at the lowest memory address, while the most significant byte is stored at the highest memory address. This means that when we read a multibyte value from memory, we start with the least significant byte and then move on to the next byte with increasing significance. Little endian is used by some processors, such as x86 and ARM.

In big endian byte order, the most significant byte of a multibyte value is stored at the lowest memory address, while the least significant byte is stored at the highest memory address. This means that when we read a multibyte value from memory, we start with the most significant byte and then move on to the next byte with decreasing significance. Big endian is used by some other processors, such as PowerPC and SPARC.

For example, consider the 32-bit integer value 0x12345678.

In little endian byte order, this value would be stored in memory as: LSB is stored at lowest address first.

 Address    |  Value
-------------|---------
0x10000000   |   0x78
0x10000001   |   0x56
0x10000002   |   0x34
0x10000003   |   0x12

In big endian byte order, the same value would be stored in memory as: MSB is stored at lowest address first.

  Address    |  Value
-------------|---------
0x10000000   |   0x12
0x10000001   |   0x34
0x10000002   |   0x56
0x10000003   |   0x78

When transferring data between systems that use different byte orders, it is important to convert the byte order to ensure that the data is interpreted correctly. This can be done using functions such as ntohl() and htonl() in C, which convert 32-bit integers between network byte order (big endian) and host byte order (either little endian or big endian depending on the system).

Return string from function – Bash scripting

How can we return string from a function ?

We can define a global variable and set the value in the function. This global variable can be accessed outside.

#!/bin/sh

# we created a global variable 
UPGRADE_PATH="abc"

#----------------------------------------------------------------------
# check if rpm package exists or not
#----------------------------------------------------------------------
function check_if_pkg_exist {
    PKG_NAME=$1
    echo "Checking if ${PKG_NAME} is exist"
    IS_EXIST=`rpm -qa | grep ${PKG_NAME}`
    if [[ ${IS_EXIST} =~ ${PKG_NAME}.* ]]; then
       return 1
    fi
    return 0
}


# function set the return value to global variable
function getUpgradePath {
    check_if_pkg_exist "chef-server"
    EXIST=$?

    if [[ ${EXIST} == 1 ]];then
        UPGRADE_PATH="chef"
    else
        UPGRADE_PATH="abc"
    fi

}

# we need to get upgrade path
# calling the function
getUpgradePath
echo "Upgrading from ${UPGRADE_PATH} to latest server"

String comparison in bash

Here is an example of comparing strings in bash. Also, uses logical AND operation.

ebscm_configure_status=0
MIGRATE_CHEF_DATA=""

# string comparison in bash
if [ $ebscm_configure_status == 0 ] && [ "${MIGRATE_CHEF_DATA}" != 'InProgress' ]; then
   echo "here"
fi